Showing posts with label AD 2012 R2. Show all posts

Wednesday, May 24, 2017

SCORCH 2016 - Protecting Active Directory Security Groups

So last year I did a fun segment for SCOM on How to Monitor Domain Administrators Group to detect unauthorized modifications to the Domain Admins, Schema Admins and Enterprise Admins groups in Active Directory. Now that we have SCORCH setup in our lab its time to take it to the next level. Once SCOM detects the change we can use SCORCH to disable the offending account, remove it from the security group and make a notation as to why the action was taken.

Modifying the Rule:
First thing we need to do is make a change to the rule we created in SCOM so SCORCH knows what to look for. In Authoring > Rules do a search for the rule you created. Right Click and select Properties. When the Properties window opens go to the Configuration Tab. Under Responses select Edit

In the Alert - Properties Click Custom alert fields

In Custom Alert Fields add DAModAdd to Custom field 1 and $Data/Params/Param[1]$ (the distinguished name of the user who was added to the group) to Custom field 2. This will tell SCORCH what and who to look for so it will kick off the Runbook when this alert is generated. Click OK to everything and you are done with SCOM for the moment.

Creating the Runbook:
This is what the Runbook looks like:
 
We are monitoring SCOM for a specific alert. It then pulls the user data from the alert and disables the account. Then we make a notation in the account as to why it was disabled. It is removed from the Domain Admins group and we then update the alert in SCOM. I also used two variables which I will get to in a moment.

Monitor Alert:
We are looking for DAModAdd from SCOM so we want CustomField1 Equals DAModAdd

Disable User:
For Disable User you need the distinguished name which we setup in the parameters of the SCOM Alert earlier.

Update User Properties:
The same custom field used again to identify the user to change. Then added Notes from Optional Properties. In the notes field I put (you can put whatever you like):
Unauthorized Group Access! User disabled by Orchestrator {Date}

Where date is the first variable I added. I invoked the NOW() wildcard in order to date stamp the account so you could tell when the account was disabled.

Remove User from Group:
Now we pull the user out of Domain Admins.
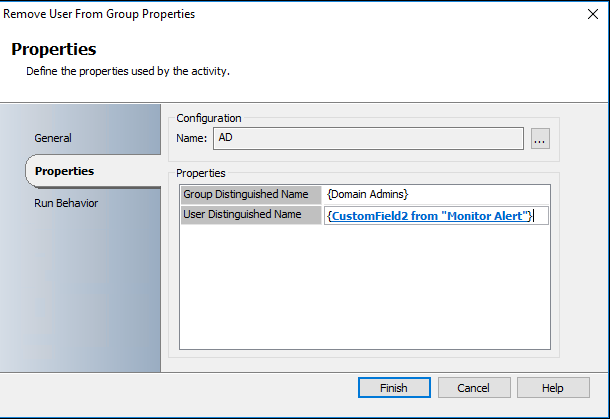
The second variable I created was {Domain Admins} as I plan to use it in later Runbooks.

Note: At the time of this writing there is a bug in the Active Directory Integration Pack. Administrators are reporting an error when trying to add or remove a user from an AD Group. The error "unknown exception caught" shows up in Runbook Tester and fails at this step. The only known fix that I was able to find is to either roll back to a previous version of the ADIP or use the PowerShell IP with the following syntax and variables described earlier:

Remove-ADGroupMember -Identity "{Domain Admins}" -Members "{CustomField2 from "Monitor Alert"}" -Confirm:$False

If someone finds a fix for this please feel free to share it in the comments. 

Update Alert:
Finally we update the SCOM alert. Some people like to just close the alert at this point but I would rather change the Resolution State and close it myself. I created a custom state called User Disabled. You can refer to Creating and Setting Resolution States for help with that.

Go ahead and run it in Runbook Tester. When it executes we should get a disabled user with this in the notes:

And an updated alert

As we did with the monitoring of Domain Admins, Schema Admins and Enterprise Admins you can do the same here. Just change the Custom field 1 to:

SAModAdd - User Added to Schema Admins
EAModAdd - User Added to Enterprise Admins

From there you can create the appropriate Runbooks.


More to come!

If you like this blog, give it a g+1

Friday, May 19, 2017

SCOM 2016 - Deployed Agent on Domain Controller Grayed Out

So I have been going through the process of setting up SCOM 2016 and came across an interesting issue. I deployed the SCOM agent to my Domain Controller using the install as other account method which, in my opinion is the preferred method. Agent installed successfully and reported back to SCOM as healthy. A short time later it went gray on me.

OK, this happens sometimes. I ran the repair using the same account (maybe I fat fingered it). Repair was successful but agent was still gray. I did an uninstall and re-install, watching it the whole time. Came back as green then a short time later it was gray again. Checked on the domain controller. Agent was running and pointing to the correct management group.

After some digging I came across this KB article which explains what is happening. In short when you use the install as other account method the service itself does not actually run using the Domain Level account specified. It only uses that account to do the physical installation and configuration. Once installed the service runs as Local System or NT Authority\System. At some time between 2012 and 2016 the security approach to agent accounts changed an according to the article "only the NT AUTHORITY\Authenticated Users security principal is allowed access to the Health Service. But when the Active Directory is hardened, or the agent is misconfigured, the Local System account cannot authenticate through the Authenticated Users security principal, therefore the agent cannot process Health Service configuration information."

So at this point there are two ways to fix this. Create a Run-As Account and deploy that to all your domain controllers or use the HSLockdown tool. I only have one DC in my lab so I opted to do the latter.

On your Domain Controller navigate to C:\Program Files\Microsoft Monitoring Agent\ Shift-Right Click on the Agent folder and select Open Command Window Here. Type hslockdown.exe /l this will list all users authenticated to access the management group.

Voila! Access has been denied to NT Authority\System. So we need to grant access to it in order to fix this. Type hslockdown.exe /a "NT Authority\System" 

You will be prompted to restart the Health Service in order for the change to take effect.

Give it a few minutes to start reporting in again, and there you go!

It's strange that I have installed the agent on literally hundreds of Domain Controllers and never had to do this before... Odd...


More to come!

If you like this blog, give it a g+1

Monday, May 8, 2017

AD 2012 R2 - Deploy BGInfo via Group Policy

So for those of you who have never worked with BGInfo before it is a free product that Microsoft bought a few years back to help identify servers that you are logged into by modifying the desktop image with a customizable file that can pull system info. It can be downloaded from Technet here. Below is a simple example of how I setup mine for my lab.

Nothing fancy but very helpful. So once you have it looking the way you want and have saved your .bgi file, copy it and the .exe file to your SYSVOL (or other shared location). I use SYSVOL because it is shared to all user and computer accounts by default and works very well for this application. 

If you don't know the location of the SYSVOL you can find it locally on your Domain Controller at C:\Windows\SYSVOL\domain\scripts or at \\domain.TLD\sysvol\domain.TLD\scripts\ if you are working remotely.

I created a new folder called BGInfo and copied the files there.

Now we need to open Group Policy Manager and create a new GPO called BGInfo. Edit that file and go to Computer Configuration > Preferences > Windows Settings 

First we need to create the new folder which we will copy the files to. Right Click on Folders and Select New > Folder

Set Action to Update and Path to C:\BGInfo Click OK
\

Now Right Click on Files and Select New > File

In Action Select Update. For Source file use the URL path to your .exe file. In Destination file use C:\BGInfo\file.exe
So Source file(you will need to change the path):
 \\lab.com\sysvol\lab.com\scripts\BGInfo\file.exe
Destination: C:\BGInfo\file.exe

Repeat this step for the .bgi file and you should have something similar to the following
5/22/17 Update - After a good deal of testing in my lab I have determined that because GPP does not update in the same manner as GPO, that you will have issues if you ever try and update the .bgi file with any changes. It will not update those changes on the local machines the way you would expect it to. As a result I added another step in the file copy process. First step is to copy the .exe. Second step is to delete the .bgi file on the local computer. Third step is to download the new file. This will help to distribute changes as they occur.

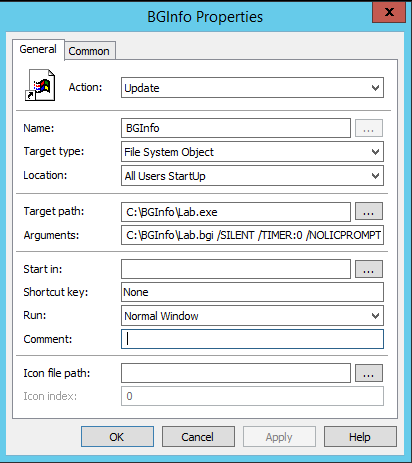
Final step is to create a shortcut to run the file when a user logs onto the system. Right Click on Shortcuts > New > Shortcut. Set Action to Update, Name it BGInfo, Target Type is File System Object and Location is All Users StartUp.
Target path: C:\BGInfo\file.exe
Arguments: C:\BGInfo\file.bgi /SILENT /TIMER:0 /NOLICPROMPT

You want to make sure you pass the arguments along so end users are not constantly prompted when they log in. 

Finally you need to apply the GPO to a test OU and run it on a test machine by doing a gpupdate /force.

The files will download and you can validate that by checking for C:\BGInfo and the .exe and .bgi files. In order for it to work you will need to log out and log back in. It takes a second but it should refresh the desktop with the new image.

More to come!

If you like this blog, give it a g+1

Wednesday, May 18, 2016

AD 2012 R2 - Disable Server Manager on Startup via Group Policy

Is anyone else annoyed with the Server Manager Dashboard opening up every time you log into a server? Me too.You can turn it off on each server manually by going to Manage > Server Manager Properties and Checking Do not start Server Manager automatically at logon:

But that only sets it for your user account and you would have to do it for each server one at a time. Fortunately there is a Group Policy setting for that. Lets go ahead and open Group Policy Management, go to Domains > Your Domain > Right Click on Group Policy Objects and select New. Lets call this one Disable Server Manager on Startup.

Right Click on the newly created GPO and select Edit. Navigate to Computer Configuration > Policies > Administrative Templates > System > Server Manager. Set Do not display Server Manager automatically at logon to Enabled and close the GPO. If you check the settings you should have:

Link the GPO to your servers OU and that's it! Next time you log into your server you won't have to close out of Server Manager.

More to come!

If you like this blog, give it a g+1

Monday, May 16, 2016

AD 2012 R2 - Enable Remote Desktop Connections via Group Policy

Another helpful GPO I use is Enabling Remote Desktop. No matter how many times I add a server to a domain I always seem to forget this setting.

So in Group Policy Management go to Domains > Your Domain > Right Click on Group Policy Objects and select New. In the Name field call it Enable RDP and Click OK. Right Click on the new GPO and select Edit.

There are two areas to modify here. Under Computer > Policies > Administrative > Templates > Windows Components > Remote Desktop Services > Remote Desktop Session Host > Connections. You want to set Allow users to connect remotely by using Remote Desktop Services to Enabled

Then under Security set Require user authentication for remote connections by using Network Level Authentication to Disabled otherwise that checkbox will be checked by default.

So if you check the settings you should have:

Link the GPO to your servers OU and do a GPUpdate /force on the server. If you did it correctly you should see that all three options are greyed out:

More to come!

If you like this blog, give it a g+1

AD 2012 R2 - Disable Windows Firewall Using Group Policy

So after a long hiatus I have decided to start blogging again. I am in the process of rebuilding my entire lab after a crash and I thought it would be good opportunity to start sharing some of my experiences in this process with you. I have several GPOs I use by default in my lab which make things a lot easier when working with different servers. One of which I have already posted. In GPO for Adding a Security Group to Local Administrators I talked about how to modify the Local Administrators group and add users or groups to it automatically. Another one I use is disabling the Windows Firewall via GPO.

This is a fairly straight forward policy. Open Group Policy Management, go to Domains > Your Domain > Right Click on Group Policy Objects and select New. In the Name field call it Disable Windows Firewall and Click OK.

Once you have the GPO created Right Click on it and choose Edit. There are two areas you want to modify. First go to Computer Configuration > Administrative Templates > Network > Network Connections > Windows Firewall > Domain Profile. Set Windows Firewall: Protect all network connections to Disabled

Then go into Standard Profile and do the same thing, set Windows Firewall: Protect all network connections to Disabled

If you check the settings you should have:

Link the GPO to your servers OU and do a GPUpdate /force on the server and you should see that the policy has taken effect:

More to come!

If you like this blog give it a g+1

Friday, January 10, 2014

Server 2012 R2 - Promoting Domain Controller

So as part of my New Years Resolutions I have decided to rebuild my lab on Server 2012 R2 and SQL 2012 SP1 then upload the whole thing to Azure to make it a little easier to run client demo's and do testing, etc. I also plan to start a new series of segments for System Center Service Manager 2012 R2 as my first set of new servers in the lab.

So starting at the beginning, I have created a new Server 2012 R2 template in Hyper-V and need to create a domain to work with.

Active Directory Domain Services:
The installation is broken up into to parts, adding the Active Directory Domain Services and doing the server promotion. Now you remember in Server 2003/2008 days the old DCPROMO command which would run this all for you. Well that was done away with in Server 2012 and in Server 2012 R2.

So In Server Manager Click Add roles and features

The Roles and Features Wizard will start, Click Next

This is a Role-based or feature-based installation, Click Next

Running this install on the local machine, Click Next

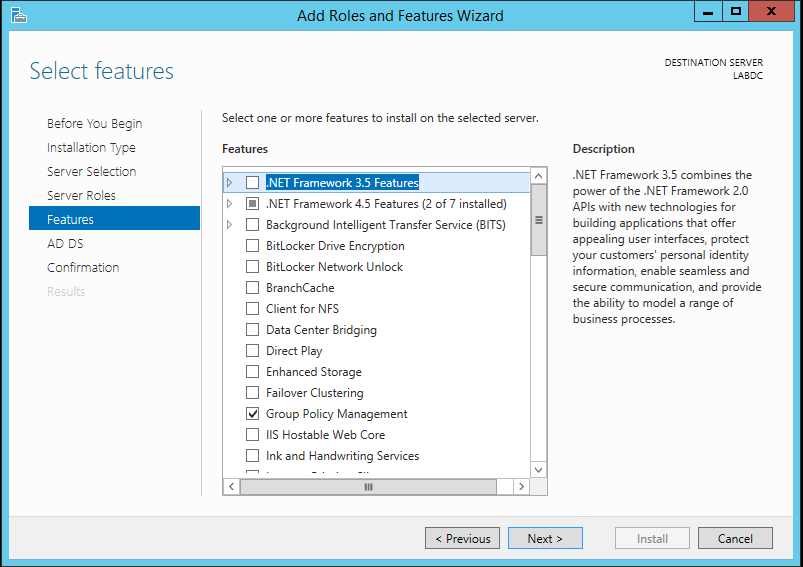
Check Active Directory Domain Services

You will be prompted to install additional features, Click Add features

Click Next

We are not adding features at this time, Click Next

Click Next

You can check the Restart the destination server automatically if required box if you like. Click Install
You can close this window once the install begins.

Promote to Domain Controller:
When the install finishes you will get a new notification. Click on the Notification flag and you will see that the feature was installed successfully. Click Promote this server to a domain controller

The Active Directory Domain Services Configuration Wizard will kick off. This is a new domain/forest so we will Select Add a new forest, and call it lab.local

I want this to be at the highest forest/domain functional level so we select Windows Server 2012 R2 for both. We also need to add a Directory Services Restore Mode password. Click Next

Since this is the first DC in the forest/domain and we don't have DNS up and running you will see an error for DNS delegation. This error can safely be ignored. Click Next

Your NetBIOS name should already be selected from the Root domain name selected earlier. Click Next

Leave these as default. Click Next

Click Next

If prerequisite checks pass Click Install
And that's it. If you checked the box to reboot the server, it will do so automatically, otherwise you you will need to do so manually to finish the install. Once it does, you can log in normally.

Note: Up to 2008 R2 you were prompted to set the domain administrator password during the DCPROMO steps. For some reason this was done away with in 2012. The DA password defaults to the local administrator password. The last thing I do is log in and change it for security reasons.

More to come!


Like this blog, give it a g+1