Friday, November 30, 2012

SCOM 2012 - Exporting Agent List

There will be times when you do a deployment where you need to validate the deployed agents against a "master list" of servers that a client has, in order to make sure that you are getting agents out to all machines. As you know using the console to do this is tedious at best. There is, however, a PowerShell command to export out the complete list of agents to a .csv file.

To pull the agent list, open Operations Manager Shell.
Start > All Programs > Microsoft System Center 2012 > Operations Manager Shell

For SCOM 2007 R2:
get-agent|export-csv -notype c:\AgentList.csv
For SCOM 2012:
get-scomagent|export-csv -notype c:\AgentList.csv
This will drop a .csv file on your C:\ called AgentList and you will be able to import this into Excel and compare with your master list.


More to come!

If you like this blog give it a g+1

SCOM 2012 - Deploying Agents to Untrusted Domains

When you have gateway servers sitting in untrusted domains you can deploy agents a couple of ways. You can use the gateway server itself or you can deploy from a management group server. I recently worked on a project where we were not able to use the gateway server because of some environmental factors so we had to deploy from the management group. The following are the steps you need to take to do this. It is similar a normal deployment with a few differences.

In the Administration space Right Click on Administration and select Discovery Wizard. Then select Windows Computers. Click Next

Select the Advanced discovery radio button. Then chose the gateway server you want to use as the primary management server. Click Next

In Discovery Method select the Browse for, or type-in computer names radio button In the active field enter the name(s) of the computers to be discovered (don't bother doing a browse for them, they won't be found). Click Next

For the Administrative Account you want to use the SCOM management account for the respective domain you are deploying to. Be sure to check This is a local computer account, not a domain account to avoid credential problems. Click Discover

You will be warned about the validation of the provided credentials, Click Yes

Check the box(s) of the computers to deploy to, choose agent or agent-less and Click Next

Leave the Agent action account as Local System and Click Finish

The agents will deploy in proper time and you are all set.


More to come!

If you like this blog give it a g+1

Thursday, November 29, 2012

SCOM 2012 - Unattended Installation

In SCOM 2012 - Installation I covered the traditional way to install SCOM using the GUI interface, and this method works just fine if you only have a few machines to build. I have found, however, when doing a larger type of engagement it is helpful to be able to setup and launch unattended installations for SCOM. When you are building half a dozen management servers and a dozen gateway servers and a web/reporting server, having unattended script files makes the install go much faster. So I thought I would go through and iterate what all the switches are as well as provide a few install samples for you.

Please be aware that all of the prerequisites still need to be met before running the silent install.

Switches
Below are the switches I have been able to pull together from various sources including the Microsoft Technet article.
Parameter Value
/silent Does not display the installation wizard.
/install Runs an installation. Use /components to indicate specific features to install.
/installpath Determines the location of the installation directory.
/components OMServer: Installs the management server.

OMConsole: Installs the Operations console.

OMWebConsole: Installs the web console.

OMReporting: Installs the Reporting server.

/ManagementGroupName: The name of the management group
/SqlServerInstance: The SQL server and instance (<server\instance>).
/DatabaseName: The name of the Operational database.
/DWSqlServerInstance: The data warehouse server and instance (<server\instance>).
/DWDatabaseName: The name of the data warehouse database.
/UseLocalSystemActionAccount Used to specify the Local System for the Management server action account.
/ActionAccountUser: The domain and user name of the Management server action account.

Used if you do not want to specify the Local System

/ActionAccountPassword: The password for the Management server action account.

Used if you do not want to specify the Local System.

/UseLocalSystemDASAccount Used to specify the Local System for the Data Access service account.
/DASAccountUser: The domain and user name of the Data Access service account.

Used if you do not want to specify the Local System.

/DASAccountPassword: The password for the Data Access service account.

Used if you do not want to specify the Local System.

/DataReaderUser: The domain and user name of the data reader account.
/DataReaderPassword: The password for the data reader account.
/DataWriterUser: The domain and user name of the data writer account.
/DataWriterPassword: The password for the data writer account.
/EnableErrorReporting: Never: Do not opt in to sending automatic error reports.

Queued: Opt in to sending error reports, but queue the reports for review before sending.

Always: Opt in to automatically send error reports.

/SendCEIPReports: 0 : Do not opt in to the Customer Experience Improvement Program (CEIP).

1 : Opt in to CEIP.

/UseMicrosoftUpdate: 0 : Do not opt in to Microsoft Update.

1 : Opt in to Microsoft Update.

/AcceptEndUserLicenseAgreement Used to specify that you accept the End User License Agreement (EULA). This is only required when you install the first management server in the management group.
/ManagementServer Used to specify the name of the management server associated with a web console and/or Reporting server that is not installed on a management server.
/WebSiteName: The name of the website. For default web installation, specify “Default Web Site”.

Used for web console installations.

/WebConsoleUseSSL Specify only if your website has Secure Sockets Layer (SSL) activated.

Used for web console installations.

/WebConsoleAuthorizationMode: Mixed: Used for intranet scenarios.

Network: Used for extranet scenarios.

Used for web console installations.

/SRSInstance The reporting server and instance (<server\instance>).

Used for Reporting Server installations.

/SendODRReports: 0: Do not opt in to sending operational data reports.

1: opt in to sending operational data reports.

Used for Reporting Server Installations.


Samples:
These are a few examples of the unattended install scripts.

To Install Management Servers (PowerShell)
Start-Process -FilePath setup.exe -ArgumentList '/silent /install /components:OMServer,OMConsole /ManagementGroupName:SCOMMgmt /SqlServerInstance:SQLServer\OpsInstance /DatabaseName:OperationsManager /DWSqlServerInstance:SQLServer\DWInstance /DWDatabaseName:OperationsManagerDW /ActionAccountUser:domain\SCOMActionAccount /ActionAccountPassword:password /DASAccountUser:domain\SCOMDataAccessAccount /DASAccountPassword:password /DatareaderUser:domain\SCOMDataReader /DatareaderPassword:password /DataWriterUser:domain\SCOMDataWriter /DataWriterPassword:password /EnableErrorReporting:Always /SendCEIPReports:1 /UseMicrosoftUpdate:1 /AcceptEndUserLicenseAgreement'
To Install IIS (PowerShell)
Import-Module ServerManager Add-WindowsFeature NET-Framework-Core,Web-Static-Content,Web-Default-Doc,Web-Dir-Browsing,Web-Http-Errors,Web-Http-Logging,Web-Request-Monitor,Web-Filtering,Web-Stat-Compression,Web-Mgmt-Console,Web-Metabase,Web-Asp-Net,Web-Windows-Auth,Web-ASP,Web-CGI -Restart
Please review SCOM 2012 - Web & Reporting Services Install for additional IIS configuration

To Install Web/Reporting Services (PowerShell)
Start-Process -FilePath setup.exe -ArgumentList '/silent /install /components:OMWebConsole,OMReporting /ManagementServer:SCOMServer /SRSInstance:Server\OpsInstance /WebSiteName:"Default Web Site" /WebConsoleAuthorizationMode:Mixed /DatareaderUser:domain\SCOMDataReader /DatareaderPassword:password /SendODRReports:1 /UseMicrosoftUpdate:1'
To Install Gateway Services (Command Line)
%WinDir%\System32\msiexec.exe /i path\Directory\MOMGateway.msi /qn /l*v path\Logs\GatewayInstall.log
ADDLOCAL=MOMGateway 
MANAGEMENT_GROUP=""
IS_ROOT_HEALTH_SERVER=0
ROOT_MANAGEMENT_SERVER_AD=
ROOT_MANAGEMENT_SERVER_DNS=
ACTIONS_USE_COMPUTER_ACCOUNT=0
ACTIONSDOMAIN=
ACTIONSUSER=
ACTIONSPASSWORD=
ROOT_MANAGEMENT_SERVER_PORT=5723
[INSTALLDIR=]


More to come!


Contributing Documentation
Technet, Technet, Powershell Daily

Tuesday, November 27, 2012

SCOM - MP Viewer

I wanted to take a moment to talk about one of the tools that I think should be in every SCOM Admins toolbox, MP Viewer. This was a tool that was originally developed for 2007 by a man named Boris Yanushpolsky who was a programmer for Microsoft. Boris left the team and it was later adapted to the 2012 platform by Daniele Muscetta a program manager, also with Microsoft.

This is the quickest and easiest way to iterate exactly what is "built in" to any given management pack. You can download the tool from Microsoft. It needs to be run on one of your management servers. It cannot be run remotely. Once you have it on your management server go ahead and run it. It will prompt you to open a .mp file. For those of you who are not aware when you extract .msi files for management packs, by default, it put them in the C:\Program Files (x86)\System Center Management Packs directory. You will need to manually download the .mp files from the System Center Marketplace.

For this example we will be exploring the Microsoft.Windows.Server.AD.2003.Monitoring.mp file. Once you have loaded the .mp file you should see something similar to below. The first think to keep in mind when using this tool is not everything in the navigation tree will have information for every management pack. These will vary depending on what type of .mp you are looking at. I will cover some of the highlights in this segment.

As you go through the navigation tree you will a few of the things I always check are Monitors and Rules. These will provide you with the baseline of all the metrics included with this .mp file. It will give you the name of the monitor, what the target is, the category type (i.e. availability, performance, etc.), and most importantly it will tell you if the metric is enabled by default. Meaning you will start polling data as soon as you install the management pack.

With Rules, similar to monitors you can see what the metric is, its type, the collection category and whether it is enabled by default. 

Views are the out-of-the-box dashboard elements that have been created for this particular .mp. You will see these in the Monitoring space under the respective management pack.

A few final things to talk about with this tool are the functions that are available with it. You can use MP Viewer to unseal .mp file, although I urge caution when doing this as you can cause problems with SCOM if you don't know what you are doing when editing the raw .xml file. You can also save the output of MP Viewer to an Excel or HTML file. I use this feature regularly when creating metric spreadsheets for clients. This gives them a place to review all of the existing metrics and determine if they are needed or not.

Take some time and get familiar with the tool, as it will be very helpful as you work with SCOM


More to come!


Monday, November 26, 2012

SCOM 2012 - Database Grooming

So I get asked fairly regularly what database grooming settings should be. How long to keep the Operational and Data Warehouse data. How to configure the Ops database is fairly simple and can be done from the management console. In the Administration space, under Settings, Double Click on Database Grooming. The Global Management Group Settings window will appear. These are the default settings initially provided during the SCOM instillation.

When you do your initial research with the client and determine what settings they want for data retention I would urge them to maintain 7 days of operational retention with the Performance signature set to no more than 2 days. When data is transferred to the data warehouse they do not lose any of the granular nature of the information so there is no reason to not purge the Ops database frequently. This will help improve the overall health of SCOM as well as improve performance.

As far as data warehouse you are not limited by anything other than the size of the database on how long you can maintain retention.You can check and see what your current settings are on your data warehouse by running the following SQL command on your DW instance:
SELECT AggregationIntervalDurationMinutes, BuildAggregationStoredProcedureName, GroomStoredProcedureName, MaxDataAgeDays, GroomingIntervalMinutes FROM StandardDatasetAggregation
Your output should look like the following:
The column to focus on is MaxDataAgeDays. Several of the items are set to 400 days or ~13 months. Originally if you wanted to adjust these settings you needed to do so right out of the SQL tables. Microsoft has since created a command line tool called the Data Warehouse Data Retention Policy tool or dwdatarp.exe which is available for download from Microsoft.

I would spend some time getting familiar with this tool and with the different datasets that exist in SCOM. You will want to take this information and discuss with your client what data is of value to them. You may get the answer "all of it is important". If this is the case I would be clear with them on what each dataset is and if they capture all of it for X days this can dramatically change the amount of space required. Kevin Holman has a great blog on what all this tool can do.

This is a good example of doing a little planning up front with the client will save them a lot of headaches down the road long after you are gone.


More to come!

SCOM 2012 - Creating Overides

Overrides are the bread and butter of SCOM 2012. When you install your management packs some of the metrics are enabled by default but a lot of them are not. After thoroughly reviewing all of the metrics available you will want to enable new metrics or change other metrics. Overrides are fairly simple to create but have a broad range of uses. You can create overrides for both rules and monitors.

I have been asked a few times what the difference is between rules and monitors and the simplest explanation I can give is monitors are stateful and rules are dynamic. So monitors are used for up/down type objects such as services and rules are for things like CPU utilization.

Creating Overrides:
To create an override go into the Authoring space then click on Monitors. For this example we will will do an override for Logical Disk Free Space % for Windows 2003 servers, so in the find window look for Windows Server 2003 Logical Disk Free Space. You may need to expand out the Windows Server 2003 Logical Disk grouping to find what you are looking for. When you get to it Right click on it and Select Overrides, then Override this Monitor, then For all objects of class: Windows Server 2003 Logical Disk.


The Override Properties window will open up and you can get a good look at all of the available override parameters for this particular metric. As you do this more often you will see that what you can override will vary for the different types of monitors and rules you are working with. 
You can see that there are quite a few for available. I will cover the highlights on a few of the more typical ones.
  • Enabled - You will see this on pretty much every monitor in every management pack. This determines if the metric is on or off. For this example you can see the default value is False so it is off.
  • InvervalSeconds - This is the time frame (in seconds) that SCOM will go out and do its check of the object. By default we are set at 900 seconds or 15 minutes. So SCOM goes out and checks this monitors health every 15 minutes.
  • Number of Samples - This is the increment of failures before an alert is generated. So for this example it is 4 samples. Combine this with IntervalSeconds and we can see that an alert would be generated after one hour of continuous failure
  • Auto-Resolve Alert - This one is fairly self explanatory. If, after an alert is generated, the condition returns back to normal the alert closes on its own.
So lets go ahead and turn this one on. Check the box next to Enabled, this will make that parameter active. Change the Override Value to True. Next lets change the Interval frequency so Check the Box next to IntervalSeconds and change the Override Value to 600.

To the right of the list you will see a column that says Enforced. What this means is if you have several overrides covering the same thing you will give this override priority over all others.


Now we need to assign this override to a Management Pack. In 2007 it was not generally best practice to assign overrides to the Default Management Pack, but that is not the case in 2012. You can use the Default Management Pack or assign it to another MP of your choosing. Click OK

You will be returned to the Monitors window. If you Right Click on Windows Server 2003 Logical Disk Free Space(%) and select Override Summary you should be presented with the following window.
You can see that both of our override parameters have saved correctly. You are now monitoring disk space for all your 2003 Windows Servers.


More to come!


Friday, November 23, 2012

SCOM 2012 - Exchange 2007 Monitoring Discovery

An interesting thing I found out about the Exchange 2007 management packs is they do not do the discovery automatically like other management packs typically do. I had to do a little troubleshooting on this issue to determine why my Exchange boxes were not pulling data. The agents were installed and configured correctly but I was not getting back data. As it turns out you need to enable discovery by creating overrides for some of the metrics to get this to work.

Overrides:
To enable the overrides go to into the Authoring space and Click Object Discoveries. In the search field look for Exchange 2007 Server Role. You should find the metrics below.
  • Exchange 2007 CCR Clustered Mailbox Server Role Discovery
  • Exchange 2007 CCR Node Role Discovery
  • Exchange 2007 Standalone CCR Node Discovery
  • Exchange 2007 CAS Role Discovery
  • Exchange 2007 Hub Transport Role Discovery
  • Exchange 2007 Edge Role Discovery
  • Exchange 2007 UM Role Discovery
Create Enable = True overrides for all.

Proxy:
If you are still having issues with discovery there is one more thing to check. You need to make sure that all of your exchange servers are setup to act as proxy servers. To do this go to the Administration space and Click Agent Managed. Do a find and search for your Exchange server. Right Click and select Properties. On the server properties window select the Security Tab. Check the box Allow this agent to act as a proxy and discover managed objects. Repeat this step for all Exchange servers (Hub, CAS, Mailbox, etc).


More to come!


Contributing Documentation:
akepettersson

SCOM 2012 - How to Remove a Management Server

There will be times when you need to remove a management server from the management group for one reason or another. In this segment I will cover the steps needed to facilitate this process successfully.

Move RMSE Role:
If the server you are trying to remove happens to be the RMSE server you will first need to migrate the role to an alternate server.
Open Operations Manager Shell, Start > All Programs > Microsoft System Center 2012 > Operations Manager Shell and run the following command
Get-SCOMManagementServer -Name "FQDN of the new RMSE Server" | Set-SCOMRMSEmulator
Delete the Management Server:
To delete the server from the management group to the Administration space, the Click Management Servers, select the server you want to remove and Right Click on it and select Delete. You will be prompted to confirm, Click Yes.

Change Primary Management Server:
You will, no doubt, have agents assigned to the management server you are removing. You will need to move those agents to another management server to ensure continuity. In the Administration space Click Agent Managed then select the computers you want to move to another management server. Right Click them and select Change Primary Management Server. The Change Management server window will appear. Select the desired management server in the list and Click OK. The change will take effect the next time the agent is scheduled to check in.

If you are changing the primary management server for a Linux or UNIX computer, the certificate that was used to access the Linux or UNIX computer must also be copied to the new management server. You do not have to copy the certificate if you are changing the primary management server for computers that are running Windows.

Copy Certificate(s) From Old to New Management Server:
Log into the management server you are removing and run an elevated command prompt. Change the directory to %ProgramFiles%\System Center 2012 – Operations Manager, then run the following command:
scxcertconfig.exe – export <filename>
Copy that file to the new management server you want to monitor agents from, run an elevated command prompt, change the directory to %ProgramFiles%\System Center 2012 – Operations Manager, then run the following command:
scxcertconfig.exe – import <filename>
Configure an Agentless Devices for Alternate Proxy:
For Agentless Servers
In the Administration space Click Agentless Managed. In the Agentless Managed pane select the agentless-managed computers you want to change the proxy agent, Right Click them and select Change Proxy Agent. In the Change Proxy Agent window select the new computer you want to run as the proxy agent and Click OK

For Agentless Network Devices
In the Administration space Click Network Devices. In the Network Devices pane select the network devices you want to change the proxy agent, Right Click them and select Change Proxy Agent. In the Change Proxy Agent window select the new computer you want to run as the proxy agent and Click OK


More to come!


Contributing Documentation:
Technet

SCOM 2012 - AV Exclusions

When you are setting up SCOM (either 2007 or 2012) it is important to make sure that if you have any anti-virus programs running on your servers that you setup exclusions for SCOM. If you don't you can dramatically impact performance of both the Operations Console and SCOM itself, as well as preventing SCOM from working properly.

Exclusions by Executable:
The first thing you want to exclude is the .exe file. Be careful when doing this as excluding executable can cause unwanted side-effects such as preventing other undesirable programs from being identified. The executable is the same for both 2007 and 2012:
  • monitoringhost.exe
Exclusions by Directory:
When setting up exclusions for directories be sure to include real-time scans, scheduled scans and local scans. I will be putting in the default directories in this segment. You may have to adjust the locations in the exemptions if you did not use the defaults. Also, if the directory has greater than 8 characters you will need to put both the long and short directory names into the exclusions list (required by some AV programs to traverse the subdirectories).

SQL Database Servers
These exclusions include the SQL Server database files that are used by Operations Manager components and the system database files for the master database and for the tempdb database. To exclude these files by directory, exclude the directory for the .ldf and .mdf files such as:
  • C:\Program Files\Microsoft SQL Server\MSSQL.1\MSSQL\Data
  • D:\MSSQL\DATA
  • E:\Program Files\Microsoft SQL Server\MSSQL.1\MSSQL\Log
You will also want to exclude file types by extension. These exclusions include the SQL Server database files that are used by Operations Manager components and the system database files for the master database and for the tempdb database. The following file name extension-specific exclusions for Operations Manager includes real-time scans, scheduled scans, and local scans.
  •     MDF
  •     LDF
Operations Manager (Management Servers, Gateways and Agents)
These exclusions include the queue and log files that are used by Operations Manager.

     For 2007
  • C:\Program Files\System Center Operations Manager 2007\Health Service State\Health Service Store
     For 2012
  • C:\Program Files\System Center Operations Manager 2012\Health Service State\Health Service Store
  • C:\Program Files\System Center 2012\Operations Manager\<Component>\Health Service State\Health Service Store (<Component> will vary depending on if the server is an Agent or Server for Operations Manager)
The following file name extension-specific exclusions for Operations Manager includes real-time scans, scheduled scans, and local scans. Operations Manager (Management Servers, Gateways and Agents). These exclusions include the queue and log files that are used by Operations Manager.
  •     EDB
  •     CHK
  •     LOG
Note Page files should also be excluded from any real-time scans.

For additional information on AV exclusions refer to KB975931


More to come!

Wednesday, November 21, 2012

SCOM 2012 - Reporting Space Not Appearing

So in a recent engagement I came across an issue with the Reporting space on the management console coming up blank (see below). None of the navigation tree objects would populate. This was a very strange error as it only was happening to me. No one else on my team or anyone on the client's side had this problem and it didn't happen on every management server only 3 out of 5. Then it happened to another one, then all of them stopped working. Then one of the people on the client's team started having the issue.

I did quite a bit of searching and could not figure out what the issue was.


I ended up reaching out to one of my buddies with Microsoft who is a product technology specialist and he was stumped too. He tried for two days to replicate the issue in his lab at MS to no avail.

Finally we started looking at other external environmental issues that may be causing it. As it turns out this particular client does not let their servers out to the internet, they have to use a proxy. So we unchecked Use a proxy server for your LAN in Internet Explorer under Options > Connections Tab > LAN settings and Poof! It worked.

Hope this helps you out as well!

Tuesday, November 20, 2012

SCOM 2012 - Issues with Pending Management Agents

I have run into issues where the Operational DB an the console get into an inconsistent state where new agents that have been deployed don't always show up in the Administration space under Pending Management. You can wait and wait and they will not show up. This can be very frustrating if you are in the middle of a new deployment. Fortunately there is a shell command you can run which will pull up all the agents that are currently sitting in a pending state.

Open the Operations Manager Shell and run the following command.
      Start > All Programs > Microsoft System Center 2012 > Operations Manager Shell
Get-SCOMPendingManagement
Additionally there are switches you can use if you know more about the agent you are looking for:
[-ComputerName <String[]> ] [-Credential <PSCredential> ] [-SCSession <Connection[]> ] [ <CommonParameters>]
Once you have surfaced the missing agents you can approve all the pending with the following:
Parameter Set: FromAgentPendingAction
Approve-SCOMPendingManagement [-PendingAction] <AgentPendingAction[]> [[-ActionAccount] <PSCredential> ] [-PassThru] [ <CommonParameters>]
This can save you time and a lot of head scratching.


More to come!

Monday, November 19, 2012

SCOM 2012 - Install and Configure Gateway Servers

If you are working on a SCOM 2012 deployment where you need to monitor and communicate with servers that live in an untrusted domain you will need to setup gateway servers to accomplish this. The gateway acts as a proxy to the unfriendly domain and will provide communication with those agents. There are quite a few requirements to get a gateway server to communicate with your management group.

Host File:
It is very important that all servers are able to resolve the FQDN of each other. Typically this is done through DNS, but if DNS is down you should have all the servers setup in a host file. If you don't update the host file you will lose monitoring on all the gateway agents if DNS goes down. To edit the host file navigate to C:\Windows\System32\drivers\etc

Double Click on Hosts and open with Notepad
On all of the Management group servers enter the IP address and  FQDN of all Gateway servers
On all of the Gateway servers enter all the Management group servers

So for the Gateway servers for example:
100.200.100.200     managementserver1.domain1.com
100.200.100.201     managementserver2.domain1.com

On the Management servers:
99.100.99.100     gatewayserver1.domain2.com
99.100.99.101     gatewayserver2.domain2.com

Save the file and close.

Firewall:
Before you begin you need to make sure that if there are any firewalls between the two domains that port 5723 is open. You can validate this by running telnet from the management server.
     telnet <FQDN of Gateway server> 5723
Telnet may need to be installed on the gateway server first.

Certificates:
Deploying gateway servers requires certificates on all servers in the management group and all gateway servers. These can be internal via a CA or external from a third party vendor like VeriSign.

If you are using a CA follow the instructions below:
Open the MMC console. Start >  run > MMC > Enter
When the MMC console opens Click on file, add/remove snap-in
In the Add or Remove Snap-ins window opens, Add Certificate Templates and Certification Authority Click OK
        Expand Certificate Templates
        In the Certificate Templates Console Right Click IPSec (Offline request) and then select duplicate template
On the General Tab type a name like SCOM Template
On the Request Handling:
        Select Allow private key to be exported
        For 2000 & 2003 Domains:
             Click CSPs
             For Windows 2003 Check Microsoft RSA SChannel Cryptographic provider
             For Windows 2000 Check Microsoft Enhanced Cryptographic provider 1.0
On the Extensions Tab:
        Select the Applications Policies and Click Edit
            Remove IP security IKE intermediate
            Add Client Authentication and Server Authentication
On the Security Tab:
        Verify that Users should have read rights and enroll rights (this will be needed later).

Now we need to add the Template to the Certificate Authority
        Expand Certification Authority
        Right Click on Certificate Templates then New then Certificate Template to Issue
        Select the template you just created and Click OK
        The template you just created should now show up in the Templates list

Now install this template on the SCOM management server using the local mmc snap-in and request it from personal certificates.

Install the Certificate on the Gateway Server:
Now that we have our certificate template we need to install it on the Gateway server. Create a .inf file called NewRequest containing the following information and save it to C:\
Subject=”CN=<FQDN of the gateway server>”
Exportable=TRUEKeyLength=2048KeySpec=1
KeyUsage=0xf0
MachineKeySet=TRUE

[EnhancedKeyUsageExtension]
OID=1.3.6.1.5.5.7.3.1
OID=1.3.6.1.5.5.7.3.2
From an elevated command prompt run the following command in the location of your .inf file:
certreq –new –f NewRequest.inf GatewayRequest.req
Open the req file and copy the key to the clipboard
Log into the CA server again and do an advanced certificate request
     For 2000 & 2003 use http://<servername>/certsrv
     For 2008 & 2008R2 use https://<servername>/certsrv
     Follow the onscreen instructions for a advanced certificate
Paste in the key in the saved request and select the template created previously. Export the certificate from the CA and import it on the gateway server, again using the mmc on the local server and place it in Personal Certificates.

This needs to be done for all management servers and all gateway servers.

For additional information regarding Certs there is a Microsoft Technet article you can refer to.

Gateway Approval Tool:
Now that we have our certs in place we need to run the gateway approval tool on the RMS box. In the installation media in SUPPORTTOOLS under your respective processor folder you will find two files:

Microsoft.EnterpriseManagement.GatewayApprovalTool.exe
Microsoft.EnterpriseManagement.GatewayApprovalTool.exe.config

Copy both of these files to the SCOM install directory under \System Center 2012\Operations Manager\Setup and run the following command in that folder from an elevated command prompt.
Microsoft.EnterpriseManagement.gatewayApprovalTool.exe /ManagementServerName=<FQDN of RMS box> /GatewayName=<FQDN of Gateway Server> /Action=Create

You will need to do this for every Gateway server you are installing.

Install Gateway Service:
Now that you have all of the prerequisites done you need to install the Gateway service. Right Click on Setup.exe and Run as administrator. As always you are greeted with the System Center 2012 screen. Under Optional Installations Click Gateway management server

You will be see the Gateway Server Setup wizard. Click Next

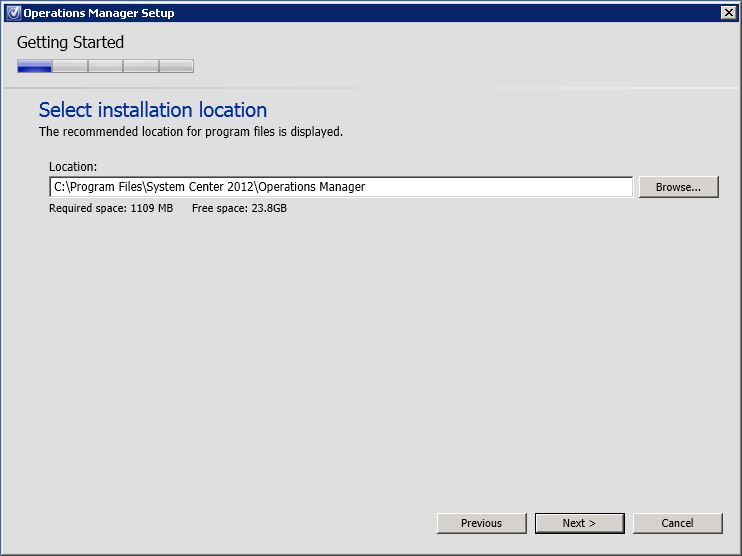
Unless you want to change the install location Click Next

On the Management Group Configuration page, enter the name of the Management Group and the FQDN of the RMS box.

For the Gateway Action Account, you should use a domain account with local administration privilege in the untrusted domain. Click Next

Review the installation and Click Install

Success! Click Finish

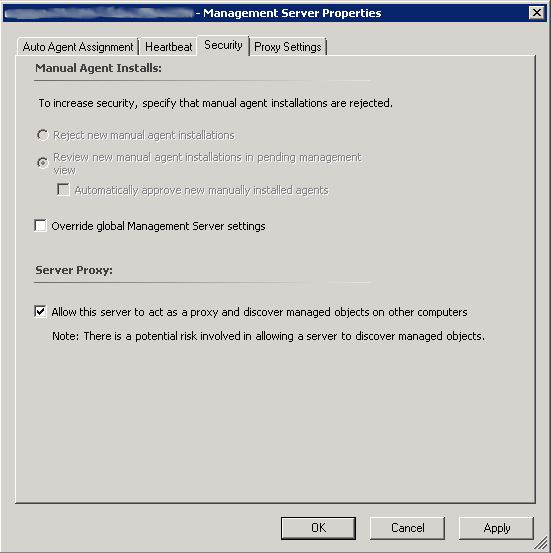
One final step for the gateway server is to configure it as a Proxy. In the Operations Console on your RMS box go to the Administration space, then click on Management Servers then find the gateway box you just added, Double Click on it. In the Management Server Properties Click the Security tab. Check the box Allow this server to act as a proxy
Click OK

Insert the Cert into SCOM:
The next bit of configuration is to run the MOMCERTIMPORT.exe tool. In the installation media in SUPPORTTOOLS under your respective processor folder run the MOMCERTIMPORT.exe tool from an elevated command prompt. You should see the cert that you installed previously. Select it and Click OK

You will see the cert was successfully installed.
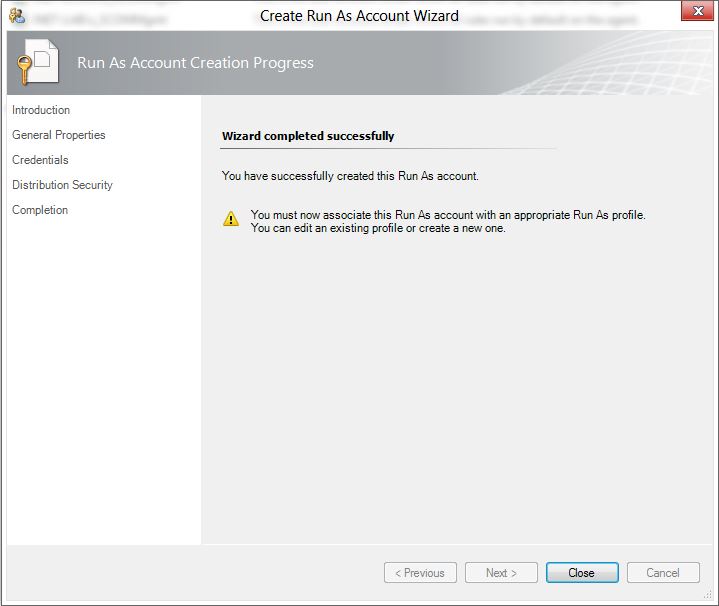
Run-As Accounts:
One final step is to make sure that the management server and the gateway server can properly communicate through the use of a run-as account. In the Administration space click under Run As Configuration, Click on Accounts. In the Actions pane click Create Run As Account. Click Next

On the General Properties page make sure that the Run As account type is Windows. Give the account a display name and Click Next

You will need to provide account credentials for this run-as account. This should be the action account in the untrusted domain where the gateway server resides. This account needs to be a local administrator on all of the gateway servers in this domain and needs local logon rights. Click Next

 On the Select a distribution security option window choose More secure and Click Next

Success! Click Close

The final step is to go into the account and assign the gateway servers. You should see your newly created account in the Accounts window.  Right Click and select Properties. On the Distribution tab Click Add. Locate the servers you want to push out to and add them to selected objects and Click OK


You should be all set at this point. You can validate this by pulling up the Management server list in Administration. I have seen this take up to an hour for the gateway server to properly check in but depending on the size and speed of your network it should take less time for the gateway server to go green.


More to come!

If you like this blog give it a g+1

Contributing Documentation:
Microsoft Technet
System Center 2012 OpsMgr Deployment Guide
M. Vanrheenen with BPMI

Saturday, November 17, 2012

SCOM 2012 - Configure Agent Failover to Multiple Gateway Servers

When you have gateway servers configured in your enterprise they agents they manage are configured, by default to contact the primary gateway server. The one assigned and configured at the time of deployment. Now if there is more than one gateway server in this untrusted domain, this is not the optimal configuration. You want to make sure that in the event of one gateway server going down all agents will look to the other server. There are a couple ways of doing this.

Both ways require the use of the  Operations Manager Shell. To configure the agents, open Operations Manager Shell.
Start > All Programs > Microsoft System Center 2012 > Operations Manager Shell

Configuring Servers One at a Time:
If you only need to configure one, or a small number of servers you can run the following command for each and it shouldn't take too much time.
$primaryMS = Get-SCOMManagementServer –Name “<name of primary server>”
$failoverMS = Get-SCOMManagementServer –Name “<name of 1st failover>”,”<name of 2nd failover>”,”<name of nth failover>”
$agent = Get-SCOMAgent –Name “<name of agent>”

Set-SCOMParentManagementServer –Agent $agent –PrimaryServer $primaryMS
Set-SCOMParentManagementServer –Agent $agent –FailoverServer $failoverMS 
You will return to a command prompt if successful.

Configuring Servers in a Group:
If you have just setup your gateway servers and deployed a lot of agents using the one at a time method is tedious and time consuming. The following script will pull the agents and gateway servers from a spreadsheet and process all of them automatically. Enter the agents and gateway servers as shown below and save the file as c:\servers.txt

Now that we have our server list lets go ahead and bring Operations Manager Shell back up and run the following command.
#Pass in comma-separated list 
$List = Import-Csv C:\servers.txt

#Loop through each line of the csv file  
ForEach ($entry in $list){ 
$AgentName = $($entry.Agent)
$PrimaryMSName = $($entry.PrimaryMS)
$FailoverMSName = $($entry.FailoverMS) 

#Set Primary Management Server on Agent
Set-SCOMParentManagementServer -Agent (Get-SCOMAgent -DNSHostName "$AgentName") `
-PrimaryServer (Get-SCOMManagementServer -Name "$PrimaryMSName")  -PassThru

#Set Fail-over Management Server on Agent
Set-SCOMParentManagementServer -Agent (Get-SCOMAgent -DNSHostName "$AgentName") `
-FailoverServer (Get-SCOMManagementServer -Name "$FailoverMSName") -PassThru
} 
It should be fairly easy to see what is happening at each step and is the fastest and simplest way to implement failover to agents.


More to come!


Contributing documentation:
Microsoft Technet
Peter Zerger

Tuesday, November 13, 2012

SCOM 2012 - Web & Reporting Services Install

So we have our pool servers, our SQL instance, SSRS is configured and now we want to setup Web and Reporting services. In this segment I will walk through how to do that. First we need to cover the prerequisites. Similar to installing the management servers we need .NET 3.5, .NET 4.0 and the Remote registry enabled. But we also need to install and configure IIS.

Prerequisites:
For the Management Server you need to have .NET 3.5 and .NET 4.0 installed as well as enabling the remote registry service and installing Microsoft Report Viewer 2010

For .NET 3.5
Open Server Manager
Click on Features
Click Add Features
Check the box for .NET Framework 3.5.1 Features
     You will be prompted to install: 
     Web Server (IIS) and Windows Process Activation Service
     Click Add Required Role Services to continue
     On Web Server (IIS) Click Next
     On Select Role Services Click Next
     On Confirm Installation Selections Click Next 

For .NET 4.0
If you don't already have a copy of .NET 4.0 you can get it from Microsoft.

Run the .NET 4.0 executable
Check I have read and accept the license terms
Click Install (this will take a few minutes depending on the specs of the box)
Click Finish

Services:
The Remote Registry Service needs to be enabled and running before you start the install. It is disabled by default

      Start > Administrative Tools > Services
      Scroll down to Remote Registry Service, Right Click, Properties
      In Startup type: Change to Automatic and Click Apply
      Then Click Start
      Then Click OK

While you are in Services, double check to make sure your SQL Server Agent Service (for instance) is started.

For IIS:
Open Server Manager
Click on Roles
Click Add Roles
Check Web Server (IIS) and Click Next
Click Next
Under Role Services, Select the following:
  • Static Content
  • Default Document
  • Directory Browsing
  • HTTP Errors
  • HTTP Logging
  • Request Monitor
  • Request Filtering
  • Static Content Compression
  • Web Server (IIS) Support
  • IIS 6 Metabase Compatibility
  • ASP.NET
  • Windows Authentication
Click Next
Review your selection and Click Install

Once IIS is installed, go ahead and open it up.
On the Server home page Double Click on ISAPI and CGI Restrictions
Select ASP.NET 4.0 (either x64 or x86 depending on your server)
In Actions Click Allow

Installation:
Lets get started with the install. Right Click on Setup.exe and Run as administrator. You should be familiar with this screen by now. Click Install

Select Web console and Reporting server. Click Next
*Note -  These roles do not need to live on the same server but if you install them together you can access reporting services from an Internet Explorer window which can be beneficial depending on the needs of your organization. I typically install them together.

Choose your install location and Click Next

Install will verify all prerequisites. If there are any issues you will need to resolve them before continuing. Click Next

On the Specify a Management Server page enter the FQDN of your RMS box. Click Next
If SQL and SSRS are installed correctly on the server the SQL Server Instance name will already be populated. Click Next

Unless you configured an alternate website for Web services the Default Web Site will be selected. At this point you may get an error that says the Web console does not have sufficient access to the operational database. This is OK. You will be able to complete the installation without issue. The only thing that won't work is the web console will not be configured for .NET Application Monitoring. To resolve this run the following command on your Operational and Data Warehouse database instances after this install finishes.
EXEC [apm].GrantRWPermissionsToComputer N'[LOGIN]
The local and remote parameters are as follows:
For local installation, the LOGIN is: IIS APPPOOL\OperationsManagerAppMonitoring
For remote installation, the LOGIN is: Domain\MachineName$

Click Next

Since this site is going to be Intranet only I selected Use Mixed Authentication. Depending on your situation you might want to go with Network Authentication. Make your selection and Click Next

You will need to provide the Data Reader service account. Click Next

On the Help improve System Center screen, the choice is yours. Select what you want and Click Next 

On Automatic Updates I generally turn this on. Make your selection and Click Next

On the Installation Summary page review your install choices and Click Install.

Install takes about twenty to thirty minutes depending on the speed of your machine.

One final thing that needs to be done is to configure permission inheritance for the web console.
Navigate to the installation directory, C:\Program Files\System Center 2012\Operations Manager\WebConsole\MonitoringView (by default).
Right Click on the TempImages folder and select Properties
On the Security tab, Click Advanced
On the Permissions tab, Click Change Permissions
Select Include inheritable permissions from this object's parent checkbox
In Permission entries, Click Administration then Click Remove, do the same for System then Click OK
Click OK to close Advanced Security Settings for Templates and then Click OK to close TempImages Properties

More to come!

Monday, November 12, 2012

SQL 2008R2 - Configuring SSRS for SCOM 2012

6/5/17 Update: This post has been deprecated. For support configuring SSRS for SCOM 2016 Refer to this post: SQL 2014 SP2 - Configuring SSRS for SCOM 2016

Now that we have SQL 2008R2 installed we need to configure SQL Server Reporting Services so that we can install SCOM 2012 Reporting services.

Lets go ahead and open up SSRS. Click on Start > All Programs > Microsoft SQL Server 2008R2 > Configuration Tools > Reporting Services Configuration Manager

You will be prompted to connect to the SQL server and instance you created earlier, this information should already be filled out. Click Connect

Once connected you will see the main SSRS configuration screen. Make sure that Report Service Status is Started, if it is not go ahead and start it.

Click on Service Account in the navigation tree. Change this to Use another account. I typically use the SCOM Data Reader account here for consistency. Click Apply

You will be prompted to create a Backup Encryption Key. Choose a file location and a password for this key and Click OK

You will then be asked to setup a SQL Server Connection. I leave this set to Current User - Integrated Security. Click OK
Your results should come out all OK. If not you will need to resolve any issues.

Click on Web Service URL in the navigation tree. You can test that the service is running correctly click on the URL link under Report Server Web Service URLs.

If everything is running properly you will get a page that looks similar to this one.

Click on Database in the navigation tree. We need to create a new database for SCOM Reporting so Click Change Database under Current Report Server Database

Select Create a new report server database and Click Next

For Database Server keep the defaults and Click Test Connection
You should see the following. Click OK then Click Next

For the Database information I like to give it a descriptive name. Call it what works for you and Click Next

You will be asked to setup the service credentials for SSRS to run. Use the Data Reader service account. Click Next

Review the summary information and if all looks good then Click Next

Everything should come out Success. If not review the results and correct any issues. Click Finish

You should see your new database information under Current Report Server Database. Click on the Report Manager in the navigation tree.

You can test that reporting services are working by clicking on the URL under Report Manager Site Identification.

You should see a page that looks like the following. To make sure permissions are set go ahead and make a new folder. If you are successful then this is working correctly. Close Internet Explorer.

For this example we will not be setting up E-mail. I will cover emailing reports in SCOM 2012 - How to Email Scheduled Reports. If you are planning on scheduling reports and having them delivered via email you will want to review this segment for additional information on how to accomplish this.

On the Execution Account page specify the Data Reader account and hit Apply. You should get a green light, if not review the results and make the needed corrections.

We will not be using encryption keys for this example to click on Scale-out Deployment. Make sure that the server status is Joined. If it is not you need to review the Service and Execution account information.

If you are joined then you are ready for SCOM 2012 - Web & Reporting Services Install


More to come!

If you like this blog give it a g+1