Recently had to do an upgrade on one of my SLQ 2008R2 servers to SP1 so I thought I would walk through the process and the steps I took to do this upgrade. First we need to get a copy of SQL 2008R2 SP1 which is available from the Microsoft Download Center. Once we have it we need to log into our SQL server with local admin privileges. Right Click on the SQLServer2008R2SP1-KB2528583-x64-ENU.exe file and Run as Administrator. The installer will kick off and automatically run the rule checker. When that finishes Click Next
Go ahead and accept the EULA and Click Next
You will be prompted to select which database instances you want to upgrade. In my case I selected everything. Click Next
The installer will check to see if there are any files in use. If it identifies any you will need to stop the related applications or services. Click Next
Review your install selections and Click Update
You can monitor the install progress which could take some time depending on how many instances you will need to update.
Success!
More to come!
If you like this blog give it a g+1
Showing posts with label SQL Server 2008R2. Show all posts
Tuesday, December 11, 2012
Monday, November 12, 2012
SQL 2008R2 - Configuring SSRS for SCOM 2012
6/5/17 Update: This post has been deprecated. For support configuring SSRS for SCOM 2016 Refer to this post: SQL 2014 SP2 - Configuring SSRS for SCOM 2016
Now that we have SQL 2008R2 installed we need to configure SQL Server Reporting Services so that we can install SCOM 2012 Reporting services.
Lets go ahead and open up SSRS. Click on Start > All Programs > Microsoft SQL Server 2008R2 > Configuration Tools > Reporting Services Configuration Manager
You will be prompted to connect to the SQL server and instance you created earlier, this information should already be filled out. Click Connect
Once connected you will see the main SSRS configuration screen. Make sure that Report Service Status is Started, if it is not go ahead and start it.
Click on Service Account in the navigation tree. Change this to Use another account. I typically use the SCOM Data Reader account here for consistency. Click Apply
You will be prompted to create a Backup Encryption Key. Choose a file location and a password for this key and Click OK
You will then be asked to setup a SQL Server Connection. I leave this set to Current User - Integrated Security. Click OK
Your results should come out all OK. If not you will need to resolve any issues.
Click on Web Service URL in the navigation tree. You can test that the service is running correctly click on the URL link under Report Server Web Service URLs.
If everything is running properly you will get a page that looks similar to this one.
Click on Database in the navigation tree. We need to create a new database for SCOM Reporting so Click Change Database under Current Report Server Database
Select Create a new report server database and Click Next
For Database Server keep the defaults and Click Test Connection
You should see the following. Click OK then Click Next
For the Database information I like to give it a descriptive name. Call it what works for you and Click Next
You will be asked to setup the service credentials for SSRS to run. Use the Data Reader service account. Click Next
Review the summary information and if all looks good then Click Next
Everything should come out Success. If not review the results and correct any issues. Click Finish
You should see your new database information under Current Report Server Database. Click on the Report Manager in the navigation tree.
You can test that reporting services are working by clicking on the URL under Report Manager Site Identification.
You should see a page that looks like the following. To make sure permissions are set go ahead and make a new folder. If you are successful then this is working correctly. Close Internet Explorer.
For this example we will not be setting up E-mail. I will cover emailing reports in SCOM 2012 - How to Email Scheduled Reports. If you are planning on scheduling reports and having them delivered via email you will want to review this segment for additional information on how to accomplish this.
On the Execution Account page specify the Data Reader account and hit Apply. You should get a green light, if not review the results and make the needed corrections.
We will not be using encryption keys for this example to click on Scale-out Deployment. Make sure that the server status is Joined. If it is not you need to review the Service and Execution account information.
If you are joined then you are ready for SCOM 2012 - Web & Reporting Services Install.
More to come!
If you like this blog give it a g+1
Now that we have SQL 2008R2 installed we need to configure SQL Server Reporting Services so that we can install SCOM 2012 Reporting services.
Lets go ahead and open up SSRS. Click on Start > All Programs > Microsoft SQL Server 2008R2 > Configuration Tools > Reporting Services Configuration Manager
You will be prompted to connect to the SQL server and instance you created earlier, this information should already be filled out. Click Connect
Once connected you will see the main SSRS configuration screen. Make sure that Report Service Status is Started, if it is not go ahead and start it.
Click on Service Account in the navigation tree. Change this to Use another account. I typically use the SCOM Data Reader account here for consistency. Click Apply
You will be prompted to create a Backup Encryption Key. Choose a file location and a password for this key and Click OK
You will then be asked to setup a SQL Server Connection. I leave this set to Current User - Integrated Security. Click OK
Your results should come out all OK. If not you will need to resolve any issues.
Click on Web Service URL in the navigation tree. You can test that the service is running correctly click on the URL link under Report Server Web Service URLs.
If everything is running properly you will get a page that looks similar to this one.
Click on Database in the navigation tree. We need to create a new database for SCOM Reporting so Click Change Database under Current Report Server Database
Select Create a new report server database and Click Next
For Database Server keep the defaults and Click Test Connection
You should see the following. Click OK then Click Next
For the Database information I like to give it a descriptive name. Call it what works for you and Click Next
You will be asked to setup the service credentials for SSRS to run. Use the Data Reader service account. Click Next
Review the summary information and if all looks good then Click Next
Everything should come out Success. If not review the results and correct any issues. Click Finish
You should see your new database information under Current Report Server Database. Click on the Report Manager in the navigation tree.
You can test that reporting services are working by clicking on the URL under Report Manager Site Identification.
You should see a page that looks like the following. To make sure permissions are set go ahead and make a new folder. If you are successful then this is working correctly. Close Internet Explorer.
For this example we will not be setting up E-mail. I will cover emailing reports in SCOM 2012 - How to Email Scheduled Reports. If you are planning on scheduling reports and having them delivered via email you will want to review this segment for additional information on how to accomplish this.
On the Execution Account page specify the Data Reader account and hit Apply. You should get a green light, if not review the results and make the needed corrections.
We will not be using encryption keys for this example to click on Scale-out Deployment. Make sure that the server status is Joined. If it is not you need to review the Service and Execution account information.
If you are joined then you are ready for SCOM 2012 - Web & Reporting Services Install.
More to come!
If you like this blog give it a g+1
Monday, October 15, 2012
SQL Server 2008R2 - Installation
So as we get started talking about installing and configuring the System Center 2012 Suite it occurs to me that we should take a step back and talk about setting up SQL. You will need to have it installed and configured correctly in order to use SC. So I am going to do my first segment on installing SQL 2008R2 and prepping it for SCOM (the next segment in the series).
You can download SQL 2008R2 Trial from the following locations if you don’t have access to a copy elsewhere.
x64 is the better choice in my opinion, unless you are installing SQL on an older box for testing there really isn't any reason to use the x86 version. I am going to install this on Windows Server 2008 R2 SP1 since that is the image I am currently working with in my lab.
Hardware/Software requirements:
A complete list of all of the hardware and software requirements can be found on the Microsoft Technet page. Please take a moment to review it to make sure you meet the minimum.
Prerequisite:
The only thing SQL Server 2008R2 needs prior to install is .NET 3.5
Open Server Manager
Click on Features
Click Add Features
Check the box for .NET Framework 3.5.1 Features
You will be prompted to install Web Server (IIS) and Windows Process Activation Service
Click Add Required Role Services to continue
On Web Server (IIS) Click Next
On Select Role Services Click Next
On Confirm Installation Selections Click Next
Installation:
Once you have the install media, right click on setup.exe and run as administrator. This is important, if you don’t run as administrator you can run into permissions issues later!
When the SQL Server Installation Center opens up (Step 1) Click Installation on the left menu.
On the Installation page (Step 2) Click New installation or add features to an existing installation.
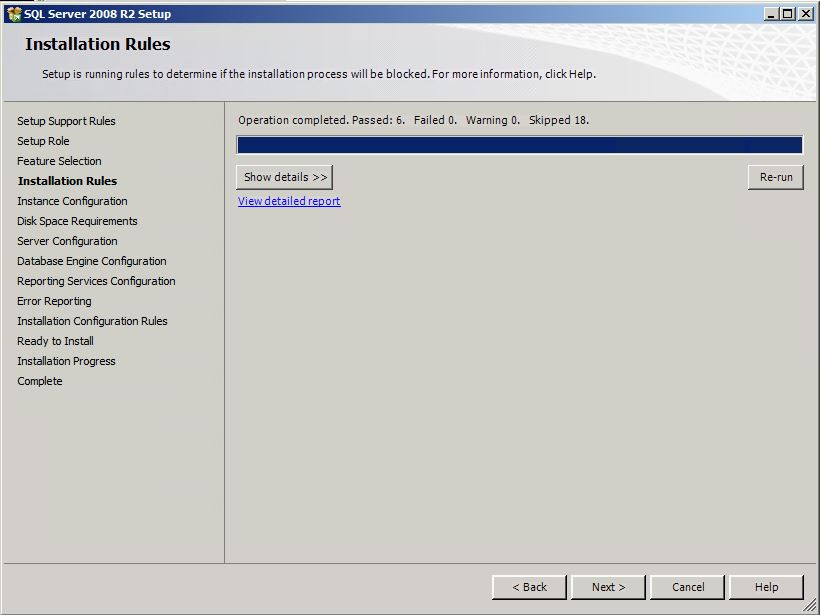
The installation will automatically go through the Setup Support Rules (Step 3). If everything passes, Click OK. Otherwise Click Show Details and resolve any issues outstanding.
On the Product Key page (Step 4) select Specify a free edition, or enter a product key if available and Click Next.
On the License Terms page Check I accept the license terms and Click Next
On the Setup Support Files (Step 6) Click Install
In step 7 the Setup Support Rules will run automatically to validate that all install issues are resolved. If they are Click Next, otherwise Click the Warning or Failed next to the error for additional details on how to resolve.
On the Setup Role select SQL Server Feature Installation then Click Next
In Step 9 Feature Selection, Check Database Engine Service, Full-Text Search, Reporting Services (I will be doing a follow up segment on configuring SSRS for SCOM later), Management Tools - Basic and Management Tools - Complete. Keep the default directories. Click Next
Installation Rules will run again to validate any install issues. As before Click Next if everything is OK, otherwise Click Show Details
In Step 11, for the sake of simplicity we are going to keep the default instance. This can be changed if you require another instance setup on the box you are working with. Click Next
On Disk Space Requirements Click Next
On Step 13, best practice dictates that you create unique service accounts for each of the SQL services running on the machine. For this example, however I am using Network Service since this is just a lab installation. Enter in the domain\username and password for each account and Click Next
For Database Engine Configuration (Step 14) Select Windows authentication mode. For Specify SQL Server administrators, I always add domain\administrator (Administrator) to ensure access. Click Next
In Reporting Services Configuration Select Install the native mode default configuration, since we are setting this up for System Center not SharePoint we don't need to create the database in SharePoint integrated mode. Click Next
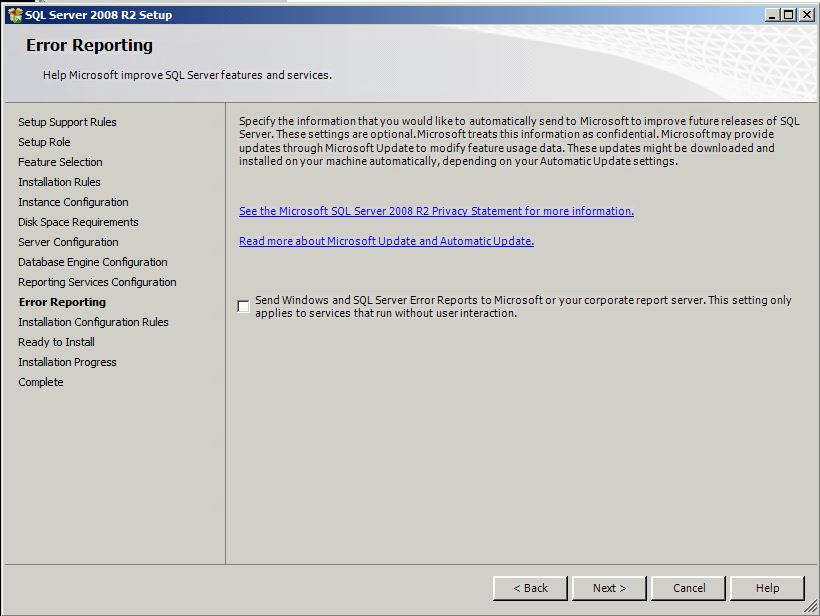
In Step 16 Error Reporting Click Next
A final Installation Configurations Rules will run. Follow procedures as before. Click Next
On Step 18 Ready to Install, review the setup information and Click Install. This is a good opportunity to go get some coffee. The install takes about twenty to thirty minutes (depending on the specs of the box) to complete.
If we did everything correctly you will be greeted with the Your SQL Server 2008 R2 installation completed successfully page, shown below.
Click Close and you are all set!
You can download SQL 2008R2 Trial from the following locations if you don’t have access to a copy elsewhere.
x64 is the better choice in my opinion, unless you are installing SQL on an older box for testing there really isn't any reason to use the x86 version. I am going to install this on Windows Server 2008 R2 SP1 since that is the image I am currently working with in my lab.
Hardware/Software requirements:
A complete list of all of the hardware and software requirements can be found on the Microsoft Technet page. Please take a moment to review it to make sure you meet the minimum.
Prerequisite:
The only thing SQL Server 2008R2 needs prior to install is .NET 3.5
Open Server Manager
Click on Features
Click Add Features
Check the box for .NET Framework 3.5.1 Features
You will be prompted to install Web Server (IIS) and Windows Process Activation Service
Click Add Required Role Services to continue
On Web Server (IIS) Click Next
On Select Role Services Click Next
On Confirm Installation Selections Click Next
Installation:
Once you have the install media, right click on setup.exe and run as administrator. This is important, if you don’t run as administrator you can run into permissions issues later!
When the SQL Server Installation Center opens up (Step 1) Click Installation on the left menu.
| Step 1 |
| Step 2 |
The installation will automatically go through the Setup Support Rules (Step 3). If everything passes, Click OK. Otherwise Click Show Details and resolve any issues outstanding.
| Step 3 |
On the Product Key page (Step 4) select Specify a free edition, or enter a product key if available and Click Next.
| Step 4 |
| Step 5 |
On the Setup Support Files (Step 6) Click Install
| Step 6 |
| Step 7 |
| Step 8 |
| Step 9 |
| Step 10 |
| Step 11 |
| Step 12 |
| Step 13 |
| Step 14 |
| Step 15 |
| Step 16 |
| Step 17 |
| Step 18 |
| Success! |
Click Close and you are all set!
Subscribe to:
Posts (Atom)