Tuesday, September 19, 2017

SCOM 2016 - Monitor & Recover a Service

Monitoring services is the bread and butter of SCOM but not a lot of people know how to actually setup service monitoring, and fewer still know how to setup SCOM to automatically restart services when they fail.

Creating the Monitor:

In the SCOM console go to Authoring > Management Pack Objects and Right Click on Monitors. Select Create a Monitor > Unit Monitor

The Create a Unit Monitor wizard will run, Select Windows Services > Basic Service Monitor. Also Select a Management Pack. Click Next

In General give the monitor a name, I like to use the friendly name of the service so I can easily go back to it. Monitor target should be Windows Computer and Parent monitor is Availability. If this is a service that is common to a lot of servers then leave Monitor is enabled checked. Otherwise uncheck it and you will have to do an override later. Click Next

If you know the service name (The actual name, not the common name in services) you can enter it here otherwise you can just browse for it but hitting the ... button. Click Next
NOTE: Make a note of the service name as you will need it later

In Configure Health set your state conditions and Click Next

Finally in Configure Alerts Check the box Generate alerts for this monitor. Update the alert description as needed and Click Create.

Setting Auto Recovery:
Now that the monitor is created go back into monitors and find it. Right click on the monitor and select Properties. Go to the Diagnostic and Recovery tab. Under Configure Recovery Tasks select Add > Recovery for critical health state

Select Run Command and Click Next

In General call it Start Service. For Recovery target select Windows Server and make sure Run recovery automatically and Recalculate monitor state after recovery finishes are both checked and Click Next

The Full path to file is %windir%\system32\net.exe and the Paramaters are Start ServiceName (captured earlier) In my case it is start MB3Service. Set the timeout to a few minutes and Click Create. 

Click Apply

Give it a few minutes to propagate out into your environment and once it does you can stop the service on a test machine to make sure the alert goes out and the service gets restarted. 


More to come!

If you like this blog give it a g+1

Tuesday, June 27, 2017

SCOM 2016 - Moving the Operations Database

There may come a time where you require to move your Operational database from one machine to another. In my case I have outgrown my existing SQL server and need to move it to a server that has more headroom. This is going to be the first of two segments where I will cover the migration of the Operations, Data Warehouse and Reporting databases to an alternate SQL server.

At a high level the process is fairly straight forward.
  1. Stop the Operations Manager services
  2. Create the backup of the Ops Database
  3. Restore the backup of the Ops Database on new hardware
  4. Update the registry and configuration files
  5. Update the Database tables
  6. Update credentials in SQL
  7. Start Operations Manager services
Depending on how many management servers you have and how large the database is this process could take a while and monitoring will be down during this time, so plan accordingly. Lets get started

Stop the Operations Manager services:
On ALL of your management servers go to services and stop the following:
  • System Center Data Access
  • Microsoft Monitoring Agent
  • System Center Management Configuration
Create the backup of the Ops Database:
On the SQL server that currently hosts the Operations database log into SQL Server Management Studio with an administrator account. Expand the SQL Server then Databases. Right Click on OperationsManager (assuming you left the name default, select the appropriate db if not) then Tasks > Back Up...

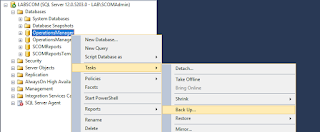
The Back Up Database Wizard will start. On the General page, In the Database field verify that OperationsManager is selected. Otherwise grab the pulldown and choose the correct database. Backup type is Full, Backup component is Database, Back up to Disk and select an appropriate location to save to (I left it default).

On the Media Options Page Select Back up to new media set, and erase all existing backup sets. Give it a name and description. For Reliability select Verify backup when finished and Click OK

Depending on how large the database is this could take a while. You will get a success message when finished.

Tip: If you want to save some time in the following segment, repeat this step for OperationsManagerDW, SCOMReports and SCOMReportsTempDB. 

Copy all four of the .bak files you just created from the old SQL server to the new SQL server and you are ready for the next step.

Restore the backups onto new hardware:
Once you have copied the .bak files to the new SQL server open SQL Server Management Studio (on the new machine) Right Click on Databases and Select Restore Database...

When the Restore Database Wizard starts you will need to select device since the destination server has no backup history information you will not be able to select Database. Click on the ... and navigate to the location of the OperationsManager.bak file created earlier. Since we are moving to a new server leave everything else default and Click OK

Success is good

Verify that the database exists and it is running

Update the Registry and Configuration Files:
The following steps will need to be performed on ALL management servers to ensure they will be able to connect to the new SQL server successfully.
  1. Run regedit on the management servers from an elevated command prompt. Navigate to HKEY Local Machine > Software > Microsoft > System Center > 2010 > Common > Database. Change DatabaseServerName to the ServerName\InstanceName,PortNumber of the new SQL server. If you left it default, the PortNumber should be 1433.
  2. Now navigate to HKEY Local Machine > Software > Microsoft > Microsoft Operations Manager > 3.0 > Setup. Change DatabaseServerName to the ServerName\InstanceName,PortNumber of the new SQL server.
  3. Next go to %ProgramFiles%\System Center 2016\Operations Manager\Server\ Open the ConfigService.config file in notepad and change the following:
    1. <Category Name="Cmdb"> Change ServerName value to ServerName\InstanceName of the new SQL server. ChangePortNumber to 1433
    2. <Category Name="ConfigStore"> Change ServerName value to ServerName\InstanceName of the new SQL server, Change PortNumber to 1433
Update the Database Tables:
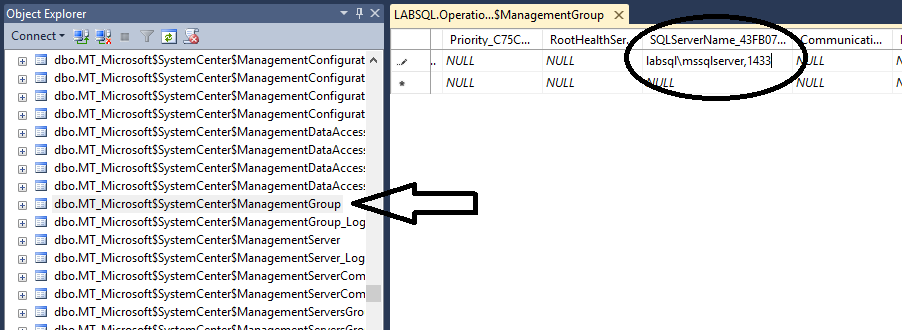
Now go back to SQL Server Management Studio on the new SQL Server. In Object Explorer expand Databases > OperationsManager > Tables

Right Click on dbo.MT_Microsoft$SystemCenter$ManagementGroup and Edit Top 200 Rows. Scroll to the right and find the column SQLServerName. Change it to the new SQL ServerName\Instance,PortNumber
Right Click on dbo.MT_Microsoft$SystemCenter$OpsMgrDB$AppMonitoring and Edit Top 200 Rows. Scroll to the right and find the column MainDatabaseServerName. Change it to the new SQL ServerName\Instance,PortNumber


Update Credentials in SQL:
Collapse Databases and expand Security > Logins. Add the following accounts and associated user mappings (if the account did not exist previously, the restore should have set these permissions for you):
  1. SCOM Read
    1. apm_datareader
    2. apm_datawriter
    3. db_datareader
    4. dwsynch_users
  2. SCOM Write
    1. db_datareader
    2. db_datawriter
    3. db_ddladmin
    4. dbmodule_users
  3. SCOM DAS
    1. ConfigService
    2. db_accessadmin
    3. db_datareader
    4. db_datawriter
    5. db_ddladmin
    6. db_securityadmin
    7. sdk_users
    8. sql_dependency_subscriber
Run the following command on the new SQL instance were the OperationsManager db is now running
sp_configure 'show advanced options', 1;
GO
RECONFIGURE;
GO
sp_configure 'clr enabled', 1;
GO
RECONFIGURE;
GO

Then run the following SQL query
SELECT is_broker_enabled FROM sys.databases WHERE name='OperationsManager'
If the result of is_broker_enabled = 1 skip the following commands and go to the final step
If the result of is_broker_enabled = 0 run the following commands
ALTER DATABASE OperationsManager SET SINGLE_USER WITH ROLLBACK IMMEDIATE
ALTER DATABASE OperationsManager SET ENABLE_BROKER
ALTER DATABASE OperationsManager SET MULTI_USER
Run the first command again and verify you are set to is_broker_enabled = 1, if not, rerun the commands

Start the Operations Manager Services:
On ALL of your management servers go to services and start the following:
  • System Center Data Access
  • Microsoft Monitoring Agent
  • System Center Management Configuration
Give it a minute for the Data Access service to initialize and open up the console. If everything was done properly you shouldn't get any errors. If you do then review the changes you made, specifically the areas where ServerName\Instance,PortNumber are involved. A typo in any of these places can prevent you from reconnecting to the database.

In the next segment we will move the Data Warehouse database


More to come!

If you like this blog give it a g+1


Contributing Documentation:
Create a Full Database Backup
Restore a Database Backup
How to configure Operations Manager to communicate with SQL Server

Wednesday, June 21, 2017

SCOM 2016 - Enable Proxy on all Agents

So if you are setting up a new instance of SCOM 2016 and have started getting Agent proxy not enabled alerts. You are not alone.

By default SCOM does not configure all new agents to act as proxy's for other agents. This is an odd thing that Microsoft for some reason has not corrected in the last four versions. Fortunately there is an easy way to fix this.

Open up PowerShellISE on your SCOM server and run the following command:
Get-SCOMAgent | where {$_.ProxyingEnabled.Value -eq $False}

This will give you a list of all the servers that do not have Proxy enabled in your environment.

To enable existing agents to run as proxy run the following:
Get-SCOMAgent | where {$_.ProxyingEnabled.Value -eq $False}|Enable-SCOMAgentProxy

If you run the first command again you should come back with no results. Change the $False to $True and it will give you a list of all the agents that are Proxy Enabled (should be all of them).

One final step. There is an easy way to enable proxy by default so you never have to set this again. Be sure to add the FQDN of your management server on the second line.
add-pssnapin “Microsoft.EnterpriseManagement.OperationsManager.Client”
new-managementGroupConnection -ConnectionString:FQDN of your management server
set-location “OperationsManagerMonitoring::”
Set-DefaultSetting -Name HealthService\ProxyingEnabled -Value True

Now every machine that gets added to the management group will be Proxy Enabled by default.


More to come!

If you like this blog give it a g+1

Monday, June 5, 2017

SQL 2014 SP2 - Configuring SSRS for SCOM 2016

Writing this as an update to a post I did a while back SQL 2008 R2 - Configuring SSRS for SCOM 2012. This post supersedes that one and should be used instead. There are a few changes in the process and it has been streamlined a bit.

Open SQL Server Reporting Services Configuration Manager. You will be prompted to connect to a server. Click Connect

On the Report Server Status page make sure that the status is Started. If it is not, start it and Apply.

On the Service Account page change the radio button to Use Another Account: Enter the SCOM Read account and password. Click Apply

In the Web Service URL page we can change the Virtual Directory (or leave it default). Click Apply. If you are successful the Report Server Web Services URLs link will become active.

Click on the link and you should see something similar to this. If you don't, repeat the previous step.

For Database, Click Change Database.

When the Report Server Database Configuration Wizard starts Select Create a new report server database and Click Next

Make sure your SQL server name is correct and Click Test Connection.

Assuming you have the name correct and the user account has access it should be successful. Click OK and then Click Next

You can change the report name or leave it default but I recommend giving it a clear name so you know what it is later. Click Next

Again, use the SCOM read account and Click Next

If you are happy with the settings Click Finish

Looks good! Click Finish

Click Apply

For Report Manager URL you can change the virtual directory or leave it default. Click Apply.

The URL link should become active. Click on it and you should see something similar to this.

For Email settings you can add your relay information or skip it if you are not ready to configure this yet. Click Apply

Execution account should also be SCOM read. Click Apply

We aren't using encryption keys so you can skip that. On Scale-Out Deployment you need to make sure that the Status is Joined. If not you will need to double check the execution account information to make sure it is correct.

More to come!

If you like this blog give it a g+1

Friday, May 26, 2017

SCOM 2016 - Setting Up External Email Relay

There will come times when you need to use an external email relay service to send notifications from SCOM. If you are working with a smaller company that uses a third party mail service for example. This is also very helpful if you are building SCOM in a lab and want to use a personal email, like Gmail to test notifications.

There are a few things you will need before we begin:
  • SMTP Username (usually your email address)
  • SMTP Password
  • SMTP server name* 
  • SMTP port*
*I have added several common email providers to the end of this post that may help you out. If your provider isn't on the list please feel free to add it in the comments and I will update the list.

Create the Run As Account:
First thing we need to do is setup a Run As account. This will be used later for SMTP authentication. Go to Administration > Run As Configuration > Accounts and Create Run As Account. When the Create Run As Account Wizard starts Click Next

Set Run As account type to Simple Authentication. Display name should be easy to remember and recognize. Click Next

For Credentials you would enter the account name and password you use to log into your mail provider. Click Next

More Secure, Click Create

Click Close

Once it is created Right Click on it and select Properties. Go to the Distribution tab and Click Add

Under Options select Search by resource pool name and Click Search. Select Notification Resource Pool and Click Add. Click OK

You should see Notification Resource Pool in the list. Click Apply

Create Run As Profile:
Next thing we need to do is setup the Run As Profile. In Administration > Run As Configuration > Profiles select Create Run as Profile... Click Next

Give it a nice clear name, select or create a management pack and Click Next

For Run As Accounts Click Add

Choose the Run As account you just created and Click OK

All good, click Create

This isn't a Run As account we will be using internally so you can disregard this. Click Close

Create SMTP Channel:
Next  thing we need is to setup the SMTP Channel. In Administration > Notifications > Channels Select New > E-Mail (SMTP)... Give it a good clear name and Click Next

In Settings Click Add

In SMTP server (FQDN): enter the relay server information. Port number should be what was provided by your email service. Authentication method: External Email Authentication and Run as profile of external email account: should be the Run As account created earlier. Click OK

You should see the SMTP server in the list. Enter a return address and Click Next

Click Finish

From here you can setup the Subscribers and Subscriptions normally.

Next thing to do is to test it. Generate an alert and see if everything processes correctly. If it does that's great!

Now for Gmail (and probably others) there will be an additional step you need to do. After the alert was created and SCOM attempted to send the email Gmail will have blocked it. You probably got an email right after similar to this.
The wonderful people at Gmail are trying to protect your security and in doing so have blocked third party relay that is unrecognized. To allow this click the allowing access to less secure apps link.

Turn Allow less secure apps to On

Close the alerts you have in SCOM and you should start seeing the mail flow.

Common Mail Providers:
Here is a list of a few providers I found information for.

Google (Gmail):
Gmail SMTP Server Name: smtp.gmail.com
Gmail SMTP port: 587

Hotmail:
Hotmail SMTP Server Name: smtp.live.com
Hotmail SMTP port: 25

Yahoo:
Yahoo SMTP Server Name: smtp.mail.yahoo.com
Yahoo SMTP port: 587

Cox:
Cox SMTP Server Name: smtp.cox.net
Cox SMTP port: 587

Comcast:
Comcast SMTP Server Name: smtp.comcast.net
Comcast SMTP port: 587

Microsoft (O365):
O365 SMTP Server Name: smtp.office365.com
O365 SMTP port: 587


More to come!

If you like this blog, give it a g+1