Expired & Superseded Updates:
First thing we need to do is get rid of any of the updates that are no longer valid. Before we do this I wanted to take a moment to explain the Update icons, what they are and what they mean.
The Normal Icon
 The icon with the green arrow represents a normal software update.
Normal software updates have been synchronized and are available for software deployment.
Operational Concerns:
There are no operational concerns.
The Expired Icon
 The icon with the black X represents an expired software update. You can also identify expired software updates by viewing the Expired column for the software update when it displays in the Configuration Manager console.
Expired software updates were previously deployable to client computers, but once a software update is expired, new deployments can no longer be created for the software updates. Expired software updates contained in active deployments continue to be available to clients.
Operational Concerns:
Replace expired software updates when possible. When software updates become expired, Configuration Manager does not remove the software updates contained within active software update deployments. Configuration Manager continues to assess software update compliance on expired software updates in deployments, but they are considered “not required” for reporting purposes.
The Superseded Icon
 The icon with the yellow star represents a superseded software update. You can also identify superseded software updates by viewing the Superseded column for the software update when it displays in the Configuration Manager console.
Superseded software updates have been replaced with newer versions of the software update. Typically, a software update that supersedes another software update does one or more of the following:
- Enhances, improves, or adds to the fix provided by one or more previously released software updates.
- Improves the efficiency of its software update file package, which clients install if the software update is approved for installation. For example, the superseded software update might contain files that are no longer relevant to the fix or to the operating systems now supported by the new software update, so those files are not included in the superseding software update's file package.
- Updates newer versions of a product, or in other words, is no longer applicable to older versions or configurations of a product. Software updates can also supersede other software updates if modifications have been made to expand language support. For example, a later revision of a product update for Microsoft Office might remove support for an older operating system, but add additional support for new languages in the initial software update release.
When possible, deploy the superseding software update to client computers instead of the superseded software update. You can display a list of the software updates that supersede the software update on the Supersedence Information tab in the software update properties.
The Invalid Icon
 The icon with the red X represents an invalid software update.
Invalid software updates are in an active deployment, but for some reason the content (software update files) is not available. The following are scenarios in which this state can occur:
- You successfully deploy the software update, but the software update file is removed from the deployment package and is no longer available.
- You create a software update deployment at a site and the deployment object is successfully replicated to a child site, but the deployment package has not successfully replicated to the child site.
When the content is missing for a software update, clients are unable to install the software update until the content becomes available on a distribution point. You can redistribute the content to distribution points by using the Redistribute action. When content is missing for a software update in a deployment created at a parent site, the software update must be replicated or redistributed to the child site.
Folders & Filtering:
So now we understand a little more about what we are dealing with. Lets isolate all of the Expired and Superseded updates so they won't interfere with the deployments. In the Software Library expand Software Updates and Right Click on All Software Updates. Select Folder then Create Folder. Call the folder Superseded & Expired

Now we have a place to put the outdated updates lets go ahead and do that. In the upper right corner of the viewing pane you will see Add Criteria. Click on it to expand the selection window. Scroll down and Check Superseded then Click Add

You will now see below the Search Bar that we have scoped for Superseded = Yes. Hit Search to Filter out the items.

Note: This is a search that you will use regularly so it is a good chance for you to save this search for easy reference later. Once you have your search results In the Navigation Bar on the Search Tab Click Save Current Search As. Call it Superseded = Yes. You will then be able to refer back to this search quickly by clicking on Saved Searches and then Selecting Manage Searches for Current Node

So now we have our filter in place and we have run it so all we should see are the updates that have been superseded. You can confirm that by checking the icons for each update on the left.

In the Display Window do a Ctrl+A to select all displayed updates. Right Click on the updates and Select Move.

The Move Selected Items window will open, Select the Superseded & Expired folder and Click OK

This will move all the updates to the sub folder so you wont have to sift through them again.
Repeat these same steps for the the Expired items so all you are left with are active current updates.
Software Update Groups:
So now we understand the updates a little better and know how to remove inactive updates, the next thing we need to do is create a Software Update Group. This is a grouping of like updates which we will use to deploy to our Test Device Collection.
Lets go back into All Software Updates and create a new filter. For the purposes of this segment we will be working with updates for Server 2008 R2. So in Add Criteria select Product. You will notice that the default search for Product is Active Directory Rights Management Services Client 2.0 (its alphabetical).

Click on it and find Windows Server 2008 R2 and Click Search

What you should be left with are all of the current Windows Server 2008 R2 updates. In the viewing pane select all of the updates (Ctrl + A), Right Click and Select Create Software Update Group.

Give it a descriptive name like Windows Server 2008 R2. You can optionally give it a more detailed description. Click Create

Now we are ready to do the deployment. In the navigation window go to Software Update Groups. Find your newly created group for Server 2008 R2. Right Click on it and Select Deploy

Deploying Updates:
The Deploy Software Wizard will start and you can begin providing information for the deployment. The Software Update/Software Update Group should already be selected. If this is your first deployment you wont have a Deployment Template available so you can skip that (don't worry we will make one shortly). Now you will remember in SCCM 2012 - Creating Device Collections from an Organizational Unit we discussed creating device collections. You should have a few already made. If not, stop now and go back and make some. You will need to have a collection of devices to deploy to. If you have them Click Browse and select your Server 2008 R2 group. Click Next

For Type of deployment you can choose between Available and Required. Since this is for updates we want this to be Required. If your network is configured for Wake-on-LAN you can check that box, otherwise skip it. For Detail level select Only Success and error messages. Click Next

For Time based on, you can set it either way but I generally prefer UTC. For Software available time you can choose As soon as possible or Specific time. If you use ASAP it content for the client will become available individually as soon as the Distribution Point has it to deploy if you set a specific time it will come as a group of updates. Installation deadline dictates the install behavior. You can choose As soon as possible which means that as soon as the DP has distributed content the client will install (and reboot if necessary). If you use Specific time it will download update content but wait to install and reboot until the deadline. Click Next

User visual experience indicates what the end user will see in Software Center. Since these are Required updates (set previously) we don't really need to let the users know what is available as they won't have the authority to be selective anyway, so I set Hide in Software Center and all notifications. Deadline behavior indicates what happens when the client hits the deadline. You want to check both boxes. Device restart behavior is pretty clear. If there is an update that requires the client to reboot, it will. You also want to check Commit changes at deadline.

On Configuration Manager alerts, this can be determined by your update policy so adjust it as required. If you have SCOM configured in your install you can automatically suppress alerts during the update run and send notifications for failed alerts. You should probably check both boxes. Click Next

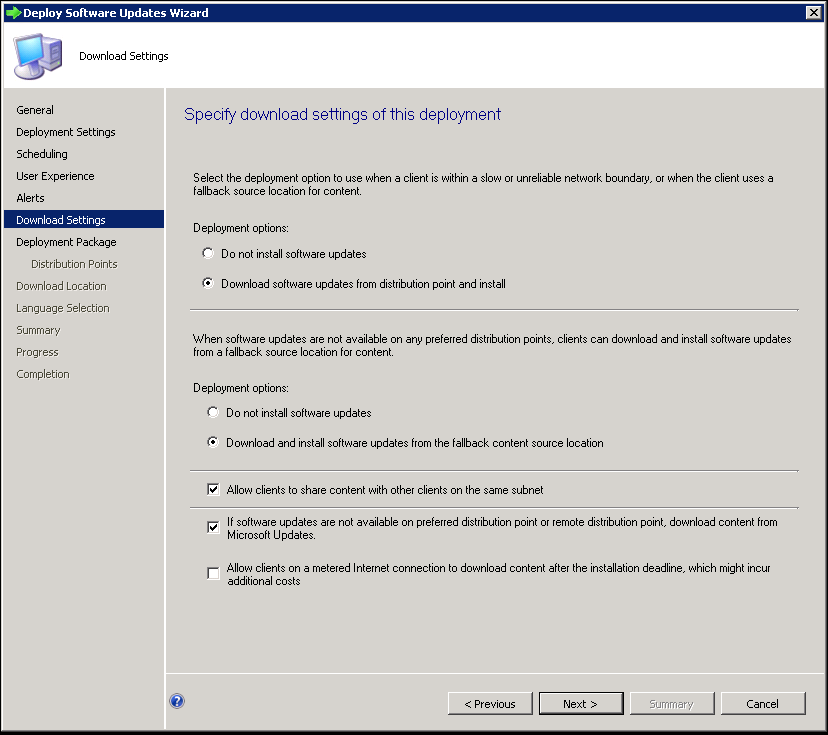
You can determine what SCCM does with the actual updates in a slow site or boundary, whether to download or not. You can also dictate what the client does if content is not available from its primary server. It can either pull from a FSP or from other clients on the same subnet. If all else fails you can tell the client to pull directly from Microsoft. Click Next
If this is the first time you have deployed updates you will be required to create a Deployment package. This just determines where the updates are placed when you download them. Give the package a name and source location (this should be the WSUSContent folder created during the SUP install). Click Next

You can also determine what distribution points to send content to. Add the DP's as needed and Click Next

To reduce WAN traffic you can pull content straight from Microsoft as opposed to a site server. If you have a decent pipe between sites and boundaries this may not matter. Click Next

Choose the languages required by your environment. Click Next

On the summary page you have the option to save the update template as an answer file for later use. Click Save As Template.


SCCM will process the request and download the required updates. Depending on how many are in the group this could take a few hours to kick off but in the end you should have something like below.

I will cover how to monitor the deployment status in an upcoming segment.
More to come!
If you like this blog give it a g+1