Wednesday, May 22, 2013

SCCM 2012 - Adding SCCM Roles

Now that SCCM is up and running and we have users and devices discovered, and we have deployed clients to them we want to look at expanding the role of the site server. There are several roles a Site server can perform and we will talk briefly about them as well as how to install these roles.

There are 18 total roles available in SCCM 2012. Upon installation and deployment of a new site several roles are installed by default. Additional roles can be added after deployment.

Site Server Roles (Default):
Configuration Manager site server - The site server role is automatically installed on your central administration site or primary sites. When you install a secondary site, the site server role is installed on the server that you specify as the secondary site server.
Configuration Manager site system - Site systems are computers that provide Configuration Manager functionality to a site. Each site system hosts one or more site system roles. This role is assigned during Configuration Manager site installation or when you add an optional site system role to another server.
Configuration Manager component site system role - Any site system that runs the SMS Executive service also installs the component site system role. This role is required to support other roles, such as a management point, and it is installed and removed with the other site system roles.
Configuration Manager site database server - A site system role that runs Microsoft SQL server and hosts the configuration Manager Site Database
SMS Provider - The SMS Provider is the interface between the Configuration Manager console and the site database. This role is installed when you install a central administration site or primary site. Secondary sites do not install the SMS Provider.

Site Server Roles (Optional):
Application Catalog web service point - A site system role that provides software information to the Application Catalog website from the Software Library.
Application Catalog website point - A site system role that provides users with a list of available software from the Application Catalog.
Asset Intelligence synchronization point - A site system role that connects to Microsoft to download Asset Intelligence catalog information and upload uncategorized titles so that they can be considered for future inclusion in the catalog.
Distribution point - A site system role that contains source files for clients to download, such as application content, software packages, software updates, operating system images, and boot images. You can control content distribution by using bandwidth, throttling, and scheduling options.
Fallback status point - A site system role that helps you monitor client installation and identify the clients that are unmanaged because they cannot communicate with their management point.
Management point - A site system role that provides policy and service location information to clients and receives configuration data from clients. You must install at least one management point at each primary site that manages clients, and at each secondary site where you want to provide a local point of contact for clients to obtain computer and user polices.
Endpoint Protection point - A site system role that Configuration Manager uses to accept the Endpoint Protection license terms and to configure the default membership for Microsoft Active Protection Service.
Enrollment point - A site system role that uses PKI certificates for Configuration Manager to enroll mobile devices and Mac computers, and to provision Intel AMT-based computers
Enrollment proxy point - A site system role that manages Configuration Manager enrollment requests from mobile devices and Mac computers.
Out of band service point - A site system role that provisions and configures Intel AMT-based computers for out of band management.
Reporting services point - A site system role that integrates with SQL Server Reporting Services to create and manage reports for Configuration Manager.
Software update point - A site system role that integrates with Windows Server Update Services (WSUS) to provide software updates to Configuration Manager clients.
State migration point - A site system role that stores user state data when a computer is migrated to a new operating system.
System Health Validator point - A site system role that validates Configuration Manager Network Access Protection (NAP) policies. It must be installed on a NAP health policy server.
Windows Intune connector - A site system role in Configuration Manager SP1 that uses Windows Intune to manage mobile devices in the Configuration Manager console.

Installing Roles:
Now that we know a little bit more about the types of roles that are available, lets go ahead and install the Application Catalog Web Service Point and Application Catalog Website Point roles. We need to make sure we add two additional IIS Role Services:
  • Windows Authentication
  • ASP.NET
Open Service Manager and Click on Roles. Scroll down to Web Server (IIS) and Click Add Role Services. In the Add Role Services wizard check Windows Authentication and ASP.NET. You will be prompted to add additional roles. Click OK. When the Install finishes, go back to the Configuration Manager Console.In the Admin space expand Overview then Site Configuration then Click Servers and Site System Roles. Right Click on your site server and Click Add Site System Roles.

The Add Site System Role wizard will open up. Click Next

Check  Application Catalog Web Service Point and Application Catalog Website Point. Click Next

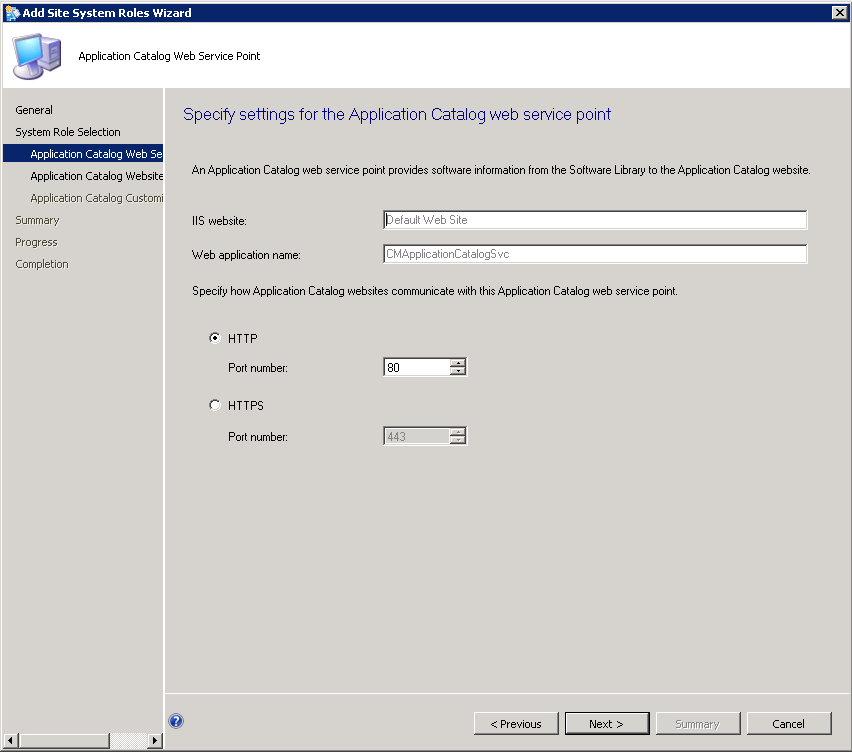
On the Application Catalog Web Service Point page you can define the IIS website and Website Application Name (URL) of the this site, it will be in http(s)://<servername>/<website application name> format. You can also determine if you want to use http or https. Click Next

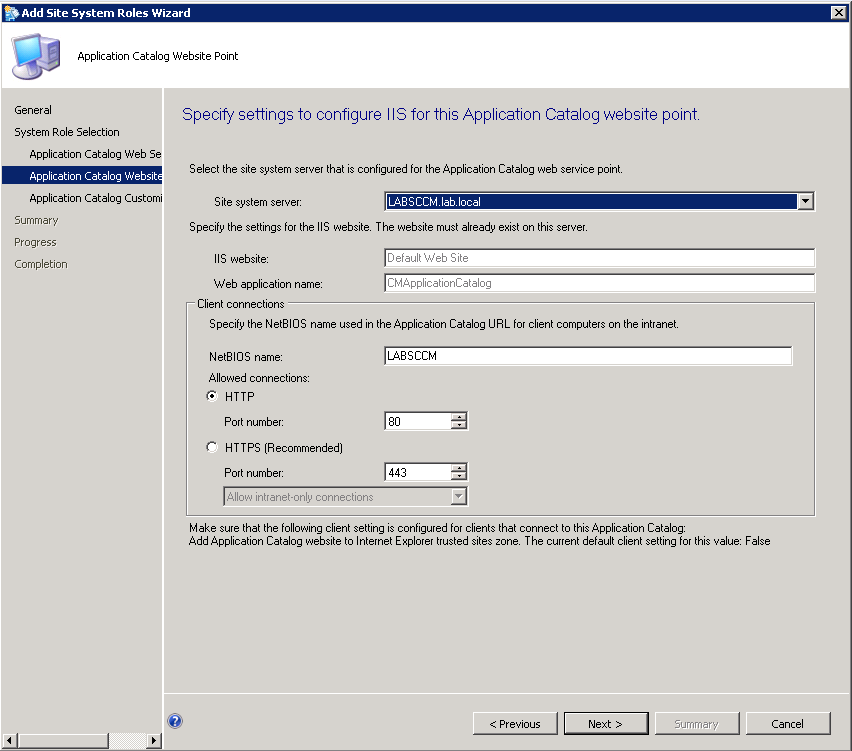
On the Application Catalog Website Point page you can define IIS website, Website application name and http / https port similar to above but you can also define the site system server (the default in our case) and the NetBIOS name (also the default). Click Next

Here you can do a little bit of custom branding by providing your organization name and selecting a  custom color theme (these can be changed later). Click Next

Review your settings and Click Next

You will get a success that the wizard has successfully kicked off the installation. You can review the progress of the install on the Monitoring space under System Status then Component Status. You can also review the install log <install directory>\Microsoft Configuration Manager\Logs\SMSPORTALWEBSetup.txt

When the install completes you should be able to navigate to http(s)://<servername>/<website application name> from a computer with Silverlight installed.


More to come!


If you like this blog, give it a g+1

Contributing documentation:
Technet

Tuesday, May 21, 2013

SCCM 2012 - Deploying Agents

So now that we have our discoveries turned on as discussed in SCCM 2012 - How to Enable Discovery we should have some devices discovered. The next thing to do is to install the local SCCM client on these machines. There are a couple different ways to set this up, one being the Client Push Installation (automatic) and the other is a manual push.

Client Push Installation
Lets cover the automatic push first since there are a few settings that need to be done either way. In the Admin space, expand out Overview then Site Configuration then Click Sites. Right Click on your primary site and then Client Installation Settings, then Client Push Installation.

Now we have a few choices here. The first is Enable automatic site-wide client push installation. Essentially, this falls in line with the discovery configured in SCCM 2012 - How to Enable Discovery. Any time a a new machine is discovered, the SCCM agent will automatically be deployed to it. If you enable this setting, then the System Types section becomes active. Here you can define where the agents are automatically deployed, Servers, Workstations and Configuration Manager servers. The final choice is whether or not to install automatically on domain controllers. If you select this option you will need to specify a domain admin account which is able to install on DC's on the Accounts tab.

On the Accounts Tab, if you have chosen to install on domain controllers you need to add a push account with domain admin access. Otherwise you can specify an account with local server / workstation admin access.

On the Installation Properties tab you can leave this as the default or you can add additional switches based on your particular needs. A complete list of command settings can be found on the Microsoft Technet. Click OK

Manual Installation
Now lets go into the Asset and Compliance space and expand out Overview then click on Devices. Depending on the size of your environment you may see a few or you may see several. Right Click on one of your machines that currently does not have an agent and Select Install Client.

The Install Configuration Manager Client Wizard will start, Click Next

If you enabled automatic install on domain controllers as discussed above, the first box will be greyed out.  You will want to install a local copy of the agent as it makes it much easier to maintain/repair/upgrade if you do. The third option, Install the client from a specific site may not bee needed depending on how many agents you are deploying. Click Next

You will be prompted to validate your settings, Click Next

The client push was setup successfully.

It may take a few minutes but you will soon see client turn to Yes and see the Client Activity go to Active.


More to come!


If you like this blog, give it a g+1

Friday, May 17, 2013

SCCM 2012 - Configuring Boundaries

In SCCM 2012 - How to Enable Discovery we discussed how to enable Discovery. So by now your scans should be complete and you should have a decent picture of what your environment looks like through SCCM. The next thing to setup in SCCM is boundaries.

First its important to understand what a boundary is and why we set them up. Microsoft defines a boundary as a network location on the intranet that can contain one or more devices that you want to manage. Boundaries can be an IP subnet, Active Directory site name, IPv6 Prefix, or an IP address range, and the hierarchy can include any combination of these boundary types.

Each boundary represents a network location in System Center 2012 Configuration Manager, and it is available from every site in your hierarchy. A boundary does not enable you to manage clients at the network location. To manage a client, the boundary must be a member of a boundary group, which is a collection of boundaries. Boundary groups help clients on the internet find their assigned site and locate content available for install such as software, applications and windows updates as well as operating system images.

Configuration Manager does not support the direct entry of a supernet as a boundary. Instead, use the IP address range boundary type. When Active Directory Forest Discovery identifies a supernet that is assigned to an Active Directory site, Configuration Manager converts the supernet into an IP address range boundary.

A few things have changed relating to boundaries since SCCM 2007:
  • Boundaries are no longer site specific, but defined once for the hierarchy, and they are available at all sites in the hierarchy.
  • Each boundary must be a member of a boundary group before a device on that boundary can identify an assigned site, or a content server such as a distribution point.
  • You no longer configure the network connection speed of each boundary. Instead, in a boundary group you specify the network connection speed for each site system server associated to the boundary group as a content location server.
Creating Boundaries and Boundary Groups:
So lets go ahead and take a look at boundaries. In the Admin space expand Hierarchy Configuration and Click Boundaries. Now you will remember when we did the Active Directory Forest Discovery we told it to automatically create site boundaries so you should see at least one already made for you. In a production environment you could potentially see several which is a good thing because you did not have to create them manually.
And there it is.

So Right Click on Default-First-Site-Name and Select Properties then go to the Boundary Groups tab you will see that this Boundary is not a member of any groups.
Now in order to make this existing boundary usable it needs to be added to a boundary group, and in order to do that we will need to create our first boundary group.

In the navigation tree, Click Boundary Groups then Click Create Boundary Group

The Create Boundary Group wizard will open. Now to help you out later I would think geographically when designing your boundary groups. For instance I used USA - Arizona - Phoenix in the example here to define a boundary group for the Phoenix office. You could use other countries, states and cities to define your groups as well and this will help you visualize the distinction between them as the hierarchy expands out. Click Add

You will see our Default-First-Site-Name is available (as well as any others that may have been discovered), go ahead and check it and Click OK

Click on the References tab. If you are setting up Site specific boundary groups as discussed earlier then you will want to check the Use this boundary group for site assignment and enter the site server you are assigning the group to. In our case we only have one site server so we use 001-Lab Site.

You also want to associate the Content location to the boundary group so Clients know which distribution point and which state migration point to connect to. You can assign multiple servers in Content location. Click Add and select the server(s) that are applicable in your situation. Click OK

Click OK

You will see your newly created boundary group updated on the list.

To verify the boundary settings go back into Boundaries and pull up the properties of Default-First-Site-Name. If you look under the Boundary Groups tab you should see the boundary group assigned similar to this.


More to come!


If you like this blog, give it a g+1


Contributing documentation:
Technet

Thursday, May 16, 2013

SCCM 2012 - How to Enable Discovery

Now that we have SCCM installed its time to start having it do some work for us. The first thing to do is to turn on discoveries and have it go out and query Active Directory to see what computers and users it can manage in the environment. There are several different types of discoveries that can be utilized.

Types of Discoveries:
Active Directory Forest Discovery
The Active Directory Forest discovery can discover sites and subnets and create Configuration Manager boundaries for them. This discovery method allows you to automatically create the Active Directory or IP subnet boundaries that are within the discovered Active Directory Forests. It supports a user-defined account as the discovery resource in each forest and can publish to the Active Directory Domain Service of a forest if publishing is enabled and the account has permissions.

Active Directory Group Discovery
The Active Directory Group discovery has the ability to discover groups from a defined location in Active Directory. This discovery includes local, global and universal security groups and the membership within these groups. With this discovery you also have the ability to discover computers that have logged on to the domain in any given period of time. Distribution groups are not discovered as group resources.
Active Directory System Discovery

Active Directory System discovery gives you the ability to discover computers in a specific location within Active Directory Domain Services. Computer discovery is required in order to push the SCCM client out to computers. You can also configure discovery for computers that have logged into the domain in a specific period of time to prevent discovery of machine accounts that are obsolete.

Active Directory User Discovery
The Active Directory User discovery is just that, it lets you discover users in specific containers within AD. This discovery comes with some solid filtering options when discovering user accounts such as attributes, child containers and groups.

Network Discovery
Network discovery searches your network infrastructure for network devices that have an IP address and can discovery devices that might be found by other discovery methods including printers, routers and bridges.

Enabling Discovery:
Now that we have a little better understanding of the different types of discoveries lets go ahead and turn them on. In the Admin space, expand Hierarchy Configuration and Select Discovery Methods.
You will see all of the discoveries discussed earlier. You will also notice that all of them are disabled by default except for Heartbeat discovery.

Where to Run Discoveries:
This is the time to consider where you intend to run discoveries. Once an object is discovered its information is disseminated within the SCCM hierarchy automatically so it may not make sense to have multiple sites querying the same information. You can, however have multiple discoveries running on alternating schedules, if items in your environment change frequently. Just be sure to not have them running simultaneously as this can cause network latency and create duplicate records in the database. Plan each discovery schedule carefully so they do not overlap. Other things to consider when setting up discoveries are running the discovery from a location which has a fast network connection to the domain controller. Also take into account the Active Directory topology as well to ensure you are discovering the most current information.

Since we are running this in a lab with only one site and one DC this is not a huge issue but for you it may be.

Active Directory Forest Discovery
Active Directory Forest discovery is one I would consider running at the top of your hierarchy. If you have built a CAS server and it is in good network proximity to the Domain Controller, I would run it on the CAS. So lets go ahead and enable Forest discovery. Right Click on Active Directory Forest Discovery and Select Properties. The Forest Discovery Properties windows will open. Check the box for Enable Active Directory Forest Discovery to enable the discovery. Then Check Automatically create Active Directory Site boundaries when they are discovered and Automatically create IP address range boundaries for IP subnets when they are discovered. For now leave the discovery schedule set to 1 Week. Click OK

You will be prompted to run the discovery as soon as possible. Click Yes

Now that we have Forest discovery enabled we want to make sure that publishing is enabled so we can write back the following information to Active Directory (assuming you extended the Active Directory Schema):
  • SMS-Site-<site code>
  • SMS-MP-<site code>-<site system server name>
  • SMS-SLP-<site code>-<site system server name>
  • SMS-<site code>-<Active Directory site name or subnet>
In the Admin space expand out Site Configuration, then Click Sites. Right Click on the server you enabled Forest discovery on and go to Properties. Make sure the Domain(s) are check and Click OK

Active Directory Group Discovery
Now lets move on to Group discovery. Back in Discovery Methods Right Click on Group Discovery and Select Properties. In the Active Directory Group Discovery Properties window Check Enable Active Directory Group Discovery. Now there are two ways to discover groups, individually by group, and by location. The latter is much easier in my opinion as it gives you the ability to query the entire domain instead of calling out individual containers. Click Add then Select Location...

For the Location you will be asked for a Name and Location. I called it All Groups. Then Click Browse

The easiest way is just to select the top level domain. The query will then go through all the containers to do a discovery. Click OK

Verify the LDAP information has been populated.  Click OK

You will see your newly added group discovery. Click on the Polling Schedule tab.

Here you can define exactly how often it does a full scan. You can also chose to have a delta discovery run (recommended). Click Schedule

In the Custom Schedule pane you can define exactly when you want the full scan to run. Adjust the time to fit your needs and Click OK

Click on the Option Tab. From here you can define how far back to go to scan for computers and how recently they have updated their passwords. I enable all three options and set the length to 90 days. Click OK

You will be prompted to run a full scan as soon as possible. Click Yes

Active Directory System Discovery
Now lets enable the System discovery. Right Click on Active Directory System Discovery and select Properties. Check the box to enable discovery and Click on the Orange Star

Same as before Click Browse and select the container you want to run discovery on. Repeat the process for multiple containers. You can select the top level of the domain as we did before but if you have a lot of computers in your environment this can cause high bandwidth utilization so you might want to run the initial scan and all scheduled scans in off peak hours. Click OK

As before adjust polling schedule to suit your environmental needs. Click on the Active Directory Attributes tab. You can see that quite a few attributes are selected by default, but you can add even more as needed. I have chosen to add badPasswordTime and badPwdCount as well. Click on the Option tab

Again Check both option boxes and set the interval to 90 days. Click OK
You will be prompted to run the initial scan as soon as possible. Click OK

Active Directory User Discovery
User discovery is very similar to System discovery. Right click on Active Directory User Discovery and select Properties. Check the box to enable discovery and Click on the Orange Star. As in System discovery select the containers you wish to scan and Click OK.

On the Polling Schedule you can define when the Scan will run.

In Active Directory Attributes you can add any additional user attributes to scan. Click OK.
You will be prompted to run the scan as soon as possible. Click OK


More to come!


If you like this blog, give it a g+1

Contributing documentation:
Technet

Wednesday, May 15, 2013

SCCM 2012 - Installation (Part 2 - Install)

UPDATE 5/26/16 - This post has been superseded by SCCM 1511 - Installation. Please see this post for your SCCM Install.

In SCCM 2012 - Installation (Part 1 - Prerequisites) we covered the basics for getting your environment and the SCCM server ready for the SCCM install. If you followed those steps the installation should go very smooth and will take you about an hour to complete.

So before we begin make sure the SCCM Admin account has local administrator rights on the SCCM server and log in as that user. Go ahead and run the splash.html file in the install directory. You will be greeted with the System Center 2012 Configuration Manager welcome screen. Click Install

Click Next

On the Available Setup Options scree you are given a few choices. At this point it is prudent to discuss our install options. To do so I will need to talk a little about what the differences are between the sites. Your choices are Central Administration Site (CAS), Primary Site, and Secondary Site.

Central Administration Site (CAS):
The Central Administration or CAS site is responsible for coordinating replication, discovery and client administration throughout your SCCM infrastructure.

Points of interest for a CAS:
  • Supports up to 25 primary child sites
  • Is required if your infrastructure exceeds 100,000 clients (the limit for a Primary Site)
  • If you are using SQL Server Enterprise you can support up to 400,000 clients
  • If you are using SQL Server Standard you can support up to 50,000 clients
  • Microsoft recommends a beefy server to support CAS. 64GB server with 16 Cores
  • The CAS server is also the content library which means every software package, windows update and application is stored on the server so additional storage space is needed.

Primary Site:
The primary site is used when your environment does not exceed 100,000 clients (SQL Enterprise on remote server) or 50,000 clients (SQL Standard locally or on remote server). It is also recommended for managing clients on networks with adequate bandwidth. Other things of note about Primary Sites, they cannot be nested under other Primary Sites and are not used as a boundary for client settings and security but do participate in SQL replication.

Secondary Site:
The Secondary Site is used in remote locations where network bandwidth is a factor. They can be nested under Primary Sites but cannot be stand alone. Management Point and Distribution Point are automatically installed during installation. They also participate in SQL replication.

If you are installing in a lab environment you can use the Use typical installation option and it will configure and install all requirements to the default setting. For this segment we will be using the Advanced install to elaborate on the different settings available during the install. Select Install a Configuration Manager primary site and Click Next

You can enter your product key if you have one or you can install as an evaluation copy. Click Next

Accept the EULA and Click Next

This is a weird throwback from previous versions. Its nice if you are building this in a lab because it will download and instal SQL Server Express and the other requirements needed for a stand alone server, but it does not give you the option to opt out if you are installing with a remote SQL instance. You will be given the choice to select a remote database instance in a later step. Go ahead and accept the EULA for each of the three options and Click Next

You will be prompted for a download location. Enter one in and Click Next

Choose all applicable languages and Click Next

Choose all applicable languages and Click Next

You will be asked to provide a Site code, a Site name and the install directory. I choose the default for the install directory, I also chose to install the Configuration Manager console. Click Next

Since this is the first server built in the environment we will be selecting Install the primary site as a stand alone site. Click Next

You will be prompted to confirm your decision. Click Yes

Here is where you can define the SQL server where your database instance resides. Enter the required information and Click Next

Since this is the first server in the hierarchy we will be using the FQDN of this machine. Click Next

If you are communicating with a lot of remote clients it might be prudent to use the HTTPS option but you will be required to provide a certificate for authentication. For the purposes of this install we are going to select Configure the communications method on each site system role and Click Next

A Management point and a Distribution point are required on the first Primary site. Use the FQDN of this machine and Click Next

I generally opt out but the choice is yours. Click Next

Review the install summary and Click Next

If you followed all the steps in SCCM 2012 - Installation (Part 1 - Prerequisites) the prerequisite checker should come up clean. Click Begin Install

The install took about forty minutes in my case but can vary depending on the speed of your server.
Click Close and you are all set!


More to come!


If you like this blog give it a g+1