Wednesday, May 25, 2016

SQL Server 2014 SP1 - Installation

As part of my rebuilding my lab I need a SQL install for SCCM. Since I am installing Current Branch (1511+) I am going to use SQL 2014 SP1 since it is supported.

You can download the trial version of SQL Server 2014 here.

Hardware/Software Requirements:
To see a full list of requirements you can visit the Technet Article, but here is the short list:
  • .NET 3.5
  • .NET 4.0
  • PowerShell 2.0
  • 6 GB of disk space
  • 1 GB of memory

Installation:
So once you have the install media and done the prerequisites installed you are ready to go. Right Click on setup.exe and run as administrator.

When the install wizard starts select Installation from the menu on the left.

On the installation page select New SQL Server stand-alone installation

Enter in your product key or select the evaluation version and Click Next

Accept the EULA and Click Next

You can chose to do the Use Microsoft Update feature if you wish. Click Next

Assess and remediate any failures and Click Next

Select SQL Server Feature Installation and Click Next
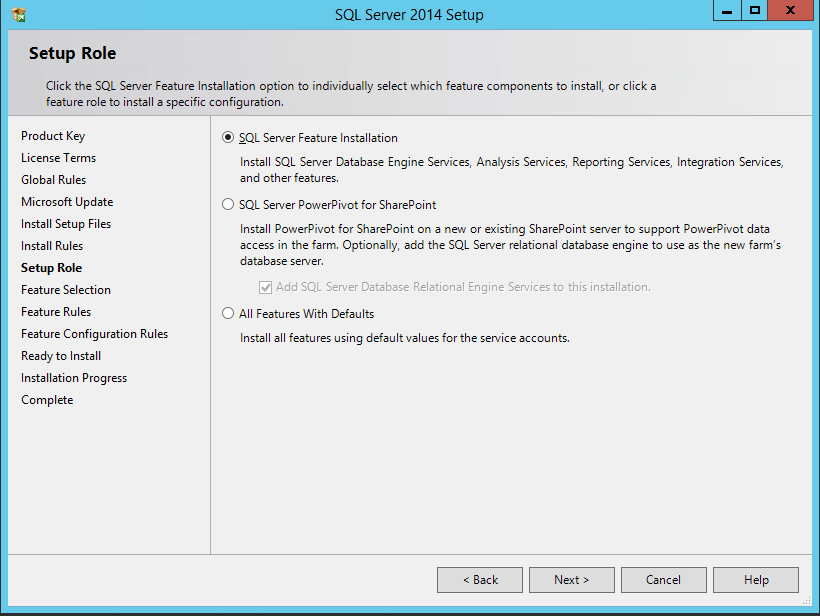
Since we are doing this for SCCM we need:
  • Full-Text and Semantic Extractions for Search
  • Reporting Services - Native
  • Management Tools - Complete
You also have the option to change the installation directories at this time. Click Next

For our needs today we will keep the default instance name. Click Next

I left the default accounts here. If you change them an SPN will need to be registered for the new account. Click Next

I left this in Windows Authentication mode and added current user. Click Next

For Reporting Services I left Install and default configuration. Click Next

Review the install summary. If you have several servers to install SQL on you can capture the unattended .ini file from the Configuration file path at the bottom. Click Install

Installation will bake for a bit

Success!

More to come!


If you like this blog, give it a g+1

Wednesday, May 18, 2016

Hyper-V - Internal Network with Internet Access

So one of the big things I wanted to do with my new lab is make sure that the servers have internet access. I wanted SCOM to be able to send notification email's and SCCM to access updates as well as other things I am planning for future expansion. I am using Hyper-V which comes free with Windows 10 Enterprise so I needed a way to do this simply and effectively. As it turns out there is a way. You can configure the Host network adapter to share its connection with a Hyper-V virtual switch and pass that connection to the guests.

First thing you do is go into Hyper-V and create a new Virtual Switch. Click on Virtual Switch Manager, select Internal and Click Create Virtual Switch.

For the Virtual Switch Properties give it an easily identifiable name. I called mine Hyper-V Internal (w/ Internet). Maker sure Internal Network is selected and Click OK

Now that we have the virtual switch created:

Next we need to enable Routing and Remote Access. On the Host machine open up services and find Routing and Remote Access. You will see that it is Disabled. Open Properties, change the startup type to Automatic (Delayed Start) and apply. Then Start the service and hit OK.

Now we need to setup the network sharing. On the host machine open up Network and Sharing Center. You should see your newly created Virtual Switch:

If you open the connection status of the Virtual Switch, go to Properties, scroll down to Internet Protocol Version 4 and check the properties there you will see that the virtual switch has been given an IP address of 192.168.137.1. This is important so we will come back to this in just a second. 

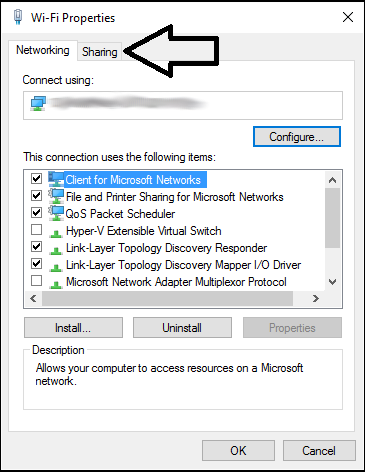
Now you want to open the network connection for the host. In my case it is the Wi-Fi connection. In Wi-Fi Status select Properties. In Wi-Fi Properties click the Sharing Tab:

In Internet Connection Sharing check the box Allow other network users to connect through this computer's Internet Connection. In the dropdown select the newly created Virtual Switch and Click OK.

All that is left to do is assign the network connection to the VM guests in Hyper-V. Right click on the VM and select Settings. In the Settings for your VM click on Network Adapter. In the virtual switch  select the newly created Virtual switch and click OK

Now for most servers you want to set up a static IP address. Even though DHCP is currently being handled by your internet router you will want to change this to static for servers. Since our Virtual Switch has an IP of 192.168.137.1 we will need to set the static IP of the guest VM to the same subnet. In my case the first machine I setup was the domain controller so I setup like the following:
The Default Gateway must be set to the IP address of the Virtual Switch (192.168.137.1). Also I have DNS setup on my domain controller so it points to itself. All of the subsequent VM guests will need to have the same subnet, default gateway and DNS.

Note -  The IP address assigned to the Virtual Switch is more or less randomly assigned. You do not need to keep it 192.168.137.1. It can be changed to whatever you would like in your environment. Just remember to use the new address as the default gateway for your servers and they all must be on the same subnet.   

From here you can test by pinging google.com

All Set!

More to come!

If you like this blog, give it a g+1

AD 2012 R2 - Disable Server Manager on Startup via Group Policy

Is anyone else annoyed with the Server Manager Dashboard opening up every time you log into a server? Me too.You can turn it off on each server manually by going to Manage > Server Manager Properties and Checking Do not start Server Manager automatically at logon:

But that only sets it for your user account and you would have to do it for each server one at a time. Fortunately there is a Group Policy setting for that. Lets go ahead and open Group Policy Management, go to Domains > Your Domain > Right Click on Group Policy Objects and select New. Lets call this one Disable Server Manager on Startup.

Right Click on the newly created GPO and select Edit. Navigate to Computer Configuration > Policies > Administrative Templates > System > Server Manager. Set Do not display Server Manager automatically at logon to Enabled and close the GPO. If you check the settings you should have:

Link the GPO to your servers OU and that's it! Next time you log into your server you won't have to close out of Server Manager.

More to come!

If you like this blog, give it a g+1

Monday, May 16, 2016

AD 2012 R2 - Enable Remote Desktop Connections via Group Policy

Another helpful GPO I use is Enabling Remote Desktop. No matter how many times I add a server to a domain I always seem to forget this setting.

So in Group Policy Management go to Domains > Your Domain > Right Click on Group Policy Objects and select New. In the Name field call it Enable RDP and Click OK. Right Click on the new GPO and select Edit.

There are two areas to modify here. Under Computer > Policies > Administrative > Templates > Windows Components > Remote Desktop Services > Remote Desktop Session Host > Connections. You want to set Allow users to connect remotely by using Remote Desktop Services to Enabled

Then under Security set Require user authentication for remote connections by using Network Level Authentication to Disabled otherwise that checkbox will be checked by default.

So if you check the settings you should have:

Link the GPO to your servers OU and do a GPUpdate /force on the server. If you did it correctly you should see that all three options are greyed out:

More to come!

If you like this blog, give it a g+1

AD 2012 R2 - Disable Windows Firewall Using Group Policy

So after a long hiatus I have decided to start blogging again. I am in the process of rebuilding my entire lab after a crash and I thought it would be good opportunity to start sharing some of my experiences in this process with you. I have several GPOs I use by default in my lab which make things a lot easier when working with different servers. One of which I have already posted. In GPO for Adding a Security Group to Local Administrators I talked about how to modify the Local Administrators group and add users or groups to it automatically. Another one I use is disabling the Windows Firewall via GPO.

This is a fairly straight forward policy. Open Group Policy Management, go to Domains > Your Domain > Right Click on Group Policy Objects and select New. In the Name field call it Disable Windows Firewall and Click OK.

Once you have the GPO created Right Click on it and choose Edit. There are two areas you want to modify. First go to Computer Configuration > Administrative Templates > Network > Network Connections > Windows Firewall > Domain Profile. Set Windows Firewall: Protect all network connections to Disabled

Then go into Standard Profile and do the same thing, set Windows Firewall: Protect all network connections to Disabled

If you check the settings you should have:

Link the GPO to your servers OU and do a GPUpdate /force on the server and you should see that the policy has taken effect:

More to come!

If you like this blog give it a g+1

Friday, January 10, 2014

Server 2012 R2 - Promoting Domain Controller

So as part of my New Years Resolutions I have decided to rebuild my lab on Server 2012 R2 and SQL 2012 SP1 then upload the whole thing to Azure to make it a little easier to run client demo's and do testing, etc. I also plan to start a new series of segments for System Center Service Manager 2012 R2 as my first set of new servers in the lab.

So starting at the beginning, I have created a new Server 2012 R2 template in Hyper-V and need to create a domain to work with.

Active Directory Domain Services:
The installation is broken up into to parts, adding the Active Directory Domain Services and doing the server promotion. Now you remember in Server 2003/2008 days the old DCPROMO command which would run this all for you. Well that was done away with in Server 2012 and in Server 2012 R2.

So In Server Manager Click Add roles and features

The Roles and Features Wizard will start, Click Next

This is a Role-based or feature-based installation, Click Next

Running this install on the local machine, Click Next

Check Active Directory Domain Services

You will be prompted to install additional features, Click Add features

Click Next

We are not adding features at this time, Click Next

Click Next

You can check the Restart the destination server automatically if required box if you like. Click Install
You can close this window once the install begins.

Promote to Domain Controller:
When the install finishes you will get a new notification. Click on the Notification flag and you will see that the feature was installed successfully. Click Promote this server to a domain controller

The Active Directory Domain Services Configuration Wizard will kick off. This is a new domain/forest so we will Select Add a new forest, and call it lab.local

I want this to be at the highest forest/domain functional level so we select Windows Server 2012 R2 for both. We also need to add a Directory Services Restore Mode password. Click Next

Since this is the first DC in the forest/domain and we don't have DNS up and running you will see an error for DNS delegation. This error can safely be ignored. Click Next

Your NetBIOS name should already be selected from the Root domain name selected earlier. Click Next

Leave these as default. Click Next

Click Next

If prerequisite checks pass Click Install
And that's it. If you checked the box to reboot the server, it will do so automatically, otherwise you you will need to do so manually to finish the install. Once it does, you can log in normally.

Note: Up to 2008 R2 you were prompted to set the domain administrator password during the DCPROMO steps. For some reason this was done away with in 2012. The DA password defaults to the local administrator password. The last thing I do is log in and change it for security reasons.

More to come!


Like this blog, give it a g+1