Now if you have gone through my previous post SCOM 2012 - Installation, we have our first box in the management group up and running. Lets go ahead and add a second machine to the management group. The process is very similar to the primary install but diverges a little in the middle.
Prerequisites:
The prerequisites for the additional management servers are the same as for the primary box.
For .NET 3.5
Open Server Manager
Click on Features
Click Add Features
Check the box for .NET Framework 3.5.1 Features
You will be prompted to install Web Server (IIS) and Windows Process Activation Service
Click Add Required Role Services to continue
On Web Server (IIS) Click Next
On Select Role Services Click Next
On Confirm Installation Selections Click Next
For .NET 4.0
If you don't already have a copy of .NET 4.0 you can get it from Microsoft.
Run the .NET 4.0 executable
Check I have read and accept the license terms
Click Install (this will take a few minutes depending on the specs of the box)
Click Finish
Services:
The Remote Registry Service needs to be enabled and running before you start the install. By default it is disabled.
Start > Administrative Tools > Services
Scroll down to Remote Registry Service, Right Click, Properties
In Startup type: Change to Automatic and Click Apply
Then Click Start
Then Click OK
Microsoft Report Viewer 2010:
The Microsoft Report Viewer 2010 needs to be installed prior to installation of SCOM 2012. you can download it from Microsoft here.
Once you have it downloaded, Right Click on ReportViewer.exe and Run as administrator
On the setup page Click Next
Accept the EULA and Click Install
When the install is complete Click Finish
Installation:
Once you have these steps taken care of go ahead and Right Click on Setup.exe and Run as administrator. As before you will be greeted with the System Center 2012 Install screen. Click Install
Check Management Server and Operations Console and Click Next
You can select the default location or choose a different location. Once selected Click Next
You will go through the prerequisite checker and if all the steps above were followed you should reach this screen. If not resolve any outstanding issues then Click Next
Here is where we start to differ from the first install. Select Add Management server to an existing management group and Click Next
You will be prompted for the Operational Database information enter <server name>\<instance name> and the port number (if not the default). It will attempt to connect to the instance and if successful the database name field will become active. Select the database where you installed the Ops DB. In this case I used the default. Click Next
You will be prompted for the Management Server Action account and the Data Access account used in the primary install and their respective passwords. Click Next if the accounts can be verified you will move onto the next page.
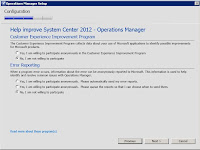
On the Customer Experience Improvement page, your participation is optional. Click Next
On the Microsoft Update page I generally choose update but you may do what you like. Click Next
Review your installation choices and Click Install
If you are successful you will see this page.
You can validate that you are successful by opening up Operations Manager on your primary box. Go to the Administration workspace > In Device Management Click Management Servers you should now see a second server in the group.
You will also see that the primary box has assumed the RMS Emulator role. The RMSE role has changed in SCOM 2012 and I will be highlighting those changes in a later segment.


How about the management packs? Will it replicated to the new SCOM management servers
ReplyDeleteYes, any installed management packs get replicated to additional management servers in the same management group.
Delete