Enable Asset Intelligence Hardware Inventory Reporting Classes:
First we need to enable AI hardware inventory classes. In the Administration Space Click on Client Settings then highlight Default Client Settings. Right Click on it and Select Properties. In the Default Settings dialogue box Click Hardware Inventory. Set Enable hardware inventory on classes to Yes. You can adjust the inventory schedule as required or leave it set as the default.
Note: It is recommend to run the scans off hours or on the weekends when system resource utilization is lower as the scans can consume quite a bit of processor.
Click Set Classes
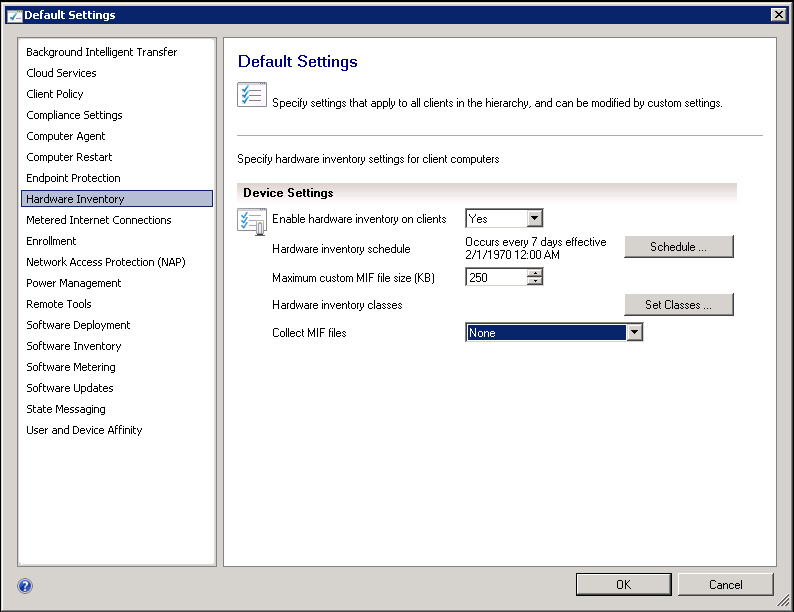
In the Hardware Inventory Classes you can adjust what items you wish to collect data on from any number of possible items. For additional information regarding the classes refer to the Technet article on them. Click OK then Click OK again.

Now we need to enable Inventory Reporting Classes. In the Asset and Compliance space Select Asset Intelligence. On the Home Tab Click Edit Inventory Classes. When the Edit Inventory Classes opens Select Enable all Asset Intelligence reporting classes or you can select individual classes.
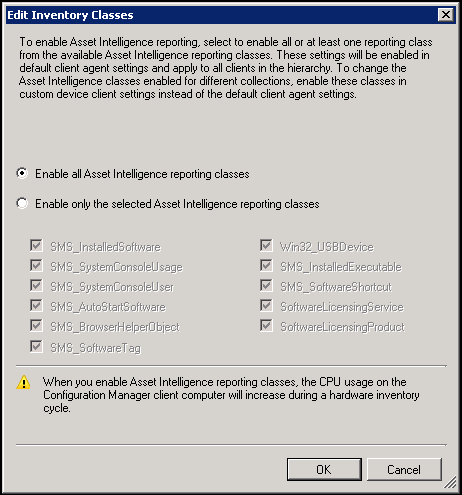
If you chose to enable all classes you will get a prompt warning you to about client system resources during the scan. Click Yes

Install Asset Intelligence Synchronization Point:
Next we need to install AI. In the Administration Space expand Site Configuration then highlight Sites. Select the site server you want to install AI on and Right Click and select Add Site System Roles. By now you should be all to familiar with the Add Site System Roles Wizard. Add the server name if not already present then select the Site code. Click Next

Add proxy information if required. Click Next

Select Asset Intelligence synchronization point. Click Next

By default, the Use this Asset Intelligence Synchronization Point setting is selected and cannot be configured on this page. System Center Online accepts network traffic only over TCP port 443, therefore the SSL port number setting cannot be configured on this page of the wizard. Click Next

You can modify the synchronization schedule as required. Keep in mind to run scans in off hours if at all possible. Click Next

Verify your settings and Click Next

You should get a success page. Click Close

Enable Auditing of Success Logon Events:
In order for AI to display information gathered from Windows Security event logs on client computers in reporting you need to enable audit logging. If it is not enabled these reports would contain no data even if the appropriate hardware inventory reporting class is enabled.
Note: The following actions will need to be performed by someone with Domain Administrator level access in Active Directory.
On your domain controller open Group Policy Management Editor. Find the SCCM policy that you created before you did the SCCM installation, Right Click and Edit (you can create a new policy if you prefer but I like to keep all my related policies together like this). Expand out Computer Configuration > Windows Settings > Security Settings > Local Policies > Audit Policy. Double Click on Audit Logon Events. Check Define these policy settings and then Check Success. Click Apply

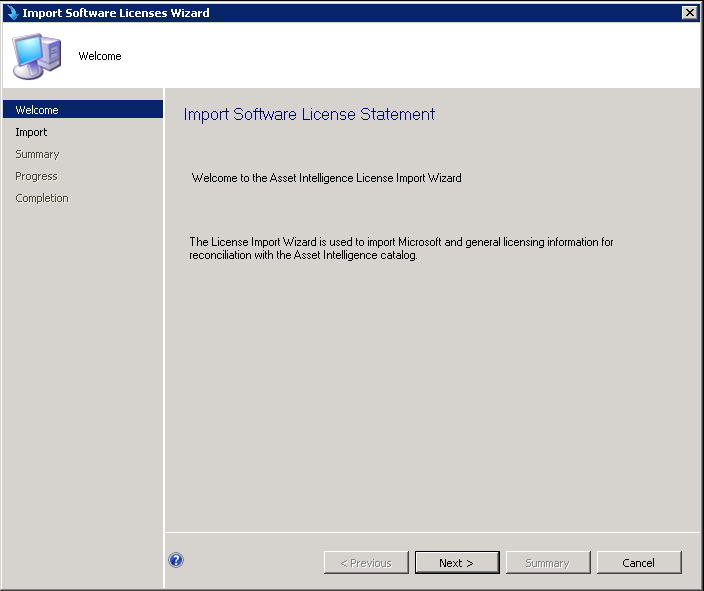
Import Software License Information:
The Import Software License Wizard is used to import Microsoft Volume Licensing (MVLS) information and general license statements into the Asset Intelligence catalog. The MVLS license statement contains information about the license entitlements, or number of purchased licenses, for Microsoft products. A general license statement contains information about the purchased licenses for any publisher.
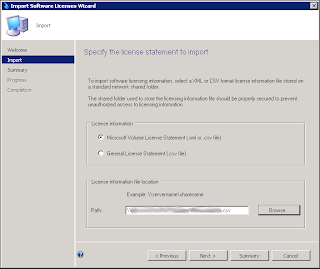
Note: The site server computer account needs Full Control permissions for the NTFS file system to the file share that is used to import software license information.
One thing to keep in mind when importing license information. Existing software license information is overwritten so ensure that the information file that you use when you do the import contains a complete listing of all necessary data. This will only update information in the license file, not any other data.
In the Assets and Compliance space Click Asset Intelligence. On the home tab Click Import Software Licenses. The Import Software License Wizard will start up. Click Next
There are two possibilities to chose from here. Microsoft Volume License Statement and General License Statement.
Microsoft Volume License Statement
The first is for importing Microsoft related product volume licenses (duh). The easiest way to gather this data is to pull it directly from the Microsoft partner website.
Open up Excel (any version), rename Sheet 1 to License Data then delete sheets 2 & 3. In the Ribbon Select Data then Click From Web. Navigate to https://licensing.microsoft.com/ and enter in your Windows Live ID. Once you are logged in Click View your license summary, click the box to Select License Data then Click Import. Click OK. You will need to remove the first column then save the file as a normal .xlsx file for future reference. Then save the file as an .xml file to the NTFS share discussed previously.
General License Statement
A General License Statement is used for all non Microsoft related products you have in AI and will need to be saved as a .csv file only.
Open up Excel (any version), rename Sheet 1 to License Data then delete sheets 2 & 3. In Row 1 Column A enter the following (each in a new column). Green items are required for all software on the list, the rest are not, but I leave them in there so I can remember the place holders and its nice to input the data if it is available.
- Name
- Publisher
- Version
- Language
- EffectiveQuantity
- PONumber
- ResellerName
- DateOfPurchase
- SupportPurchased
- SupportExpirationDate
- Comments
Now that we have our license file created select Microsoft or General depending on your need and browse to the file. Click Next
You will get a summary, Click Next

Once you have success Click Close

Configure Asset Intelligence Maintenance Tasks:
There are two types of Maintenance tasks available in AI. Check Application Title With Inventory Information and Summarize Installed Software Data
Check Application Title With Inventory Information
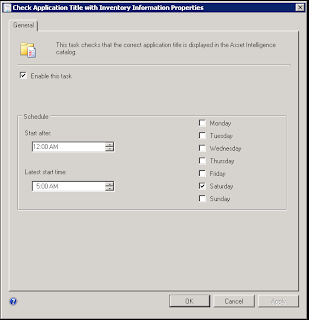
This maintenance task checks that the software title that is reported in software inventory is reconciled with the software title in the Asset Intelligence catalog. By default, this task is enabled and scheduled to run on Saturday after 12:00 A.M. and before 5:00 A.M. This maintenance task is only available at the top-level site in your Configuration Manager hierarchy.
Summarize Installed Software Data (Available only on Primary Sites)
This maintenance task provides the information that is displayed in the Assets and Compliance workspace, in the Inventoried Software node, under the Asset Intelligence node. When the task runs, Configuration Manager gathers a count for all inventoried software titles at the primary site. By default, this task is enabled and scheduled to run every day after 12:00 A.M. and before 5:00 A.M. This maintenance task is available only on primary sites.

Locate Check Application Title With Inventory Information and Click Edit

Check Enable this task and set the schedule appropriate for your environment. Click OK
Summarize Installed Software Data (Available only on Primary Sites). Click Edit

Check Enable this task and set the schedule appropriate for your environment. Click OK


You will get a summary, Click Next

Once you have success Click Close

Configure Asset Intelligence Maintenance Tasks:
There are two types of Maintenance tasks available in AI. Check Application Title With Inventory Information and Summarize Installed Software Data
Check Application Title With Inventory Information
This maintenance task checks that the software title that is reported in software inventory is reconciled with the software title in the Asset Intelligence catalog. By default, this task is enabled and scheduled to run on Saturday after 12:00 A.M. and before 5:00 A.M. This maintenance task is only available at the top-level site in your Configuration Manager hierarchy.
Summarize Installed Software Data (Available only on Primary Sites)
This maintenance task provides the information that is displayed in the Assets and Compliance workspace, in the Inventoried Software node, under the Asset Intelligence node. When the task runs, Configuration Manager gathers a count for all inventoried software titles at the primary site. By default, this task is enabled and scheduled to run every day after 12:00 A.M. and before 5:00 A.M. This maintenance task is available only on primary sites.
Go to the Administration Space, Expand Site Configuration then Click Sites. Highlight the server that has AI installed on it and and on the Home tab Click Site Maintenance

Locate Check Application Title With Inventory Information and Click Edit

Check Enable this task and set the schedule appropriate for your environment. Click OK

Summarize Installed Software Data (Available only on Primary Sites). Click Edit

Check Enable this task and set the schedule appropriate for your environment. Click OK

Congratulations Asset Intelligence is now up and running
More to come!
Like this blog, give it a g+1
very nice interested blog very nice blog full information
ReplyDeleteThanks very much for sharing Jim.
ReplyDeleteNice post! This blog has given me a better understanding. Thanks a lot for such an informative blog post. Cheers!
ReplyDeletegps tracking software india | gps tracking system in jaipur
Nice article.
ReplyDeleteWell explained.
Thank you!
It is very interested your post
ReplyDeleteasset management software
Thanks Admin your post is so nice and very informative.
ReplyDeletesccm asset management
upgrade from ie8 to ie11