Prerequisites:
There are a few things that need to be setup before we begin.
Service Accounts/Groups
You need two service accounts and a security group
- SCORCHAdmin - This will run your SCORCH management, runbook and be your admin account. This account needs to be local admin on all SCORCH servers
- SCORCHSql - This will be your SQL service account
- SCORCHUsers- This will be your global security group to give user access to SCORCH. This group needs to be local admin on all SCORCH servers
Servers
You will need two servers, SCORCH Runbook Server and a database server. They will need the following:1. SCORCH
- 1 GB Ram (min)
- .net 3.5
- Add-WindowsFeature NET-Framework-Core
- Add-WindowsFeature NET-Framework-Core -source D:\sources\sxs
- IIS Role (setup will add this if not installed previously)
- .net 4.0
- .net 4.5
2. SQL
- Install SQL Server 2014 SP1 (for additional information please see SQL 2014 SP1 - Installation)
- Database Engine Services
- Full-Text and Semantic Extractions for Search
- Reporting Services - Native
- Management Tools (basic and complete)
Installation:
The installation is one of the more straight forward System Center installs. After you extract the install files go ahead and run the SetupOrchestrator.exe file and Click Install
You can enter a product key or run as evaluation edition. Click Next

Accept the EULA and Click Next

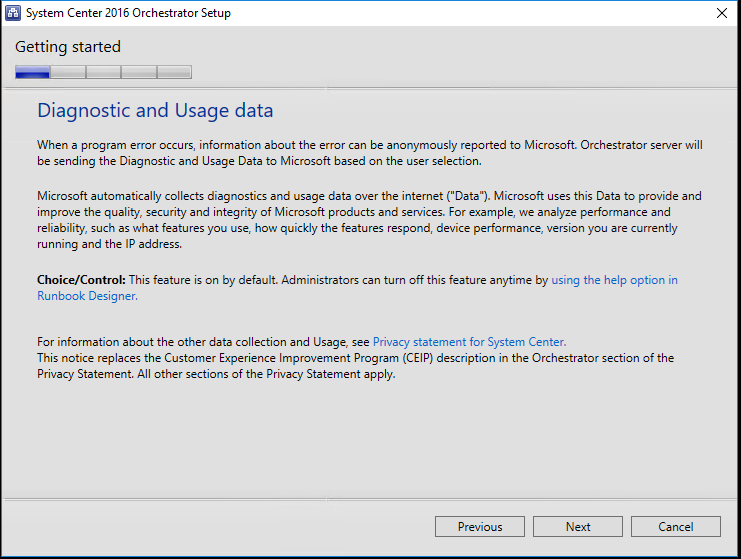
If you want to disable this I will show you how at the end of the segment. Click Next
We are going to install all the features. Click Next

I intentionally left out the IIS roles to show that it will install any prerequisite components if needed. Select any missing features and Click Next

Installing Prerequisites

If No prerequisites are missing or post install Click Next

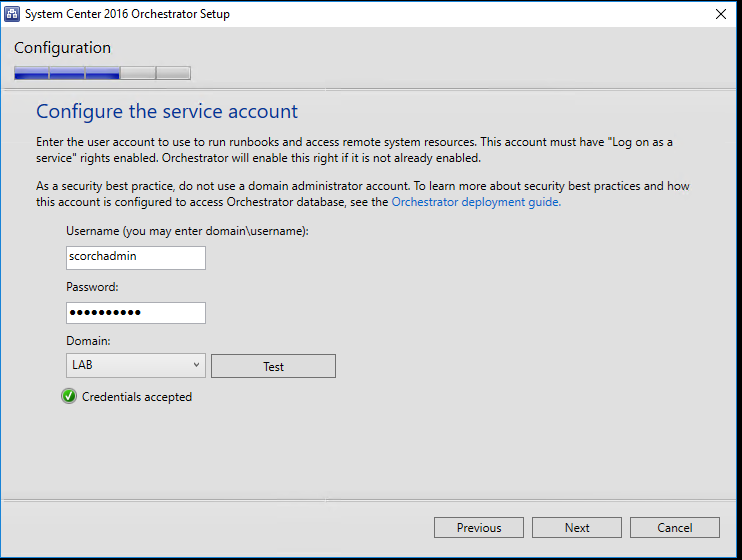
Enter the SCORCH Admin account you created earlier and Click Text. If all is well Click Next
Enter the Server\Instance of the second SCORCH server when you installed SQL. Depending on how you setup the user accounts you may need to select SQL Authentication and enter the SQL account that has access. Click Test Database Connection. If all is well Click Next. Otherwise you will need to troubleshoot the connection

Enter the database name you want to use. I kept the default. Click Next

Enter the SCORCH User group created earlier and Click Next

I kept the defaults. Click Next

Click Next

Dealers choice. Click Next

Dealers choice again. Click Next

Review the installation settings you selected and Click Install

When the install is finished Click Close

When the Runbook Designer opens there is one final step if you want to disable Diagnostic and Usage Data. Click Help > Diagnostic and Usage Data.. Select No and Click OK

All Finished!
More to come!
If you like this blog, give it a g+1
No comments:
Post a Comment